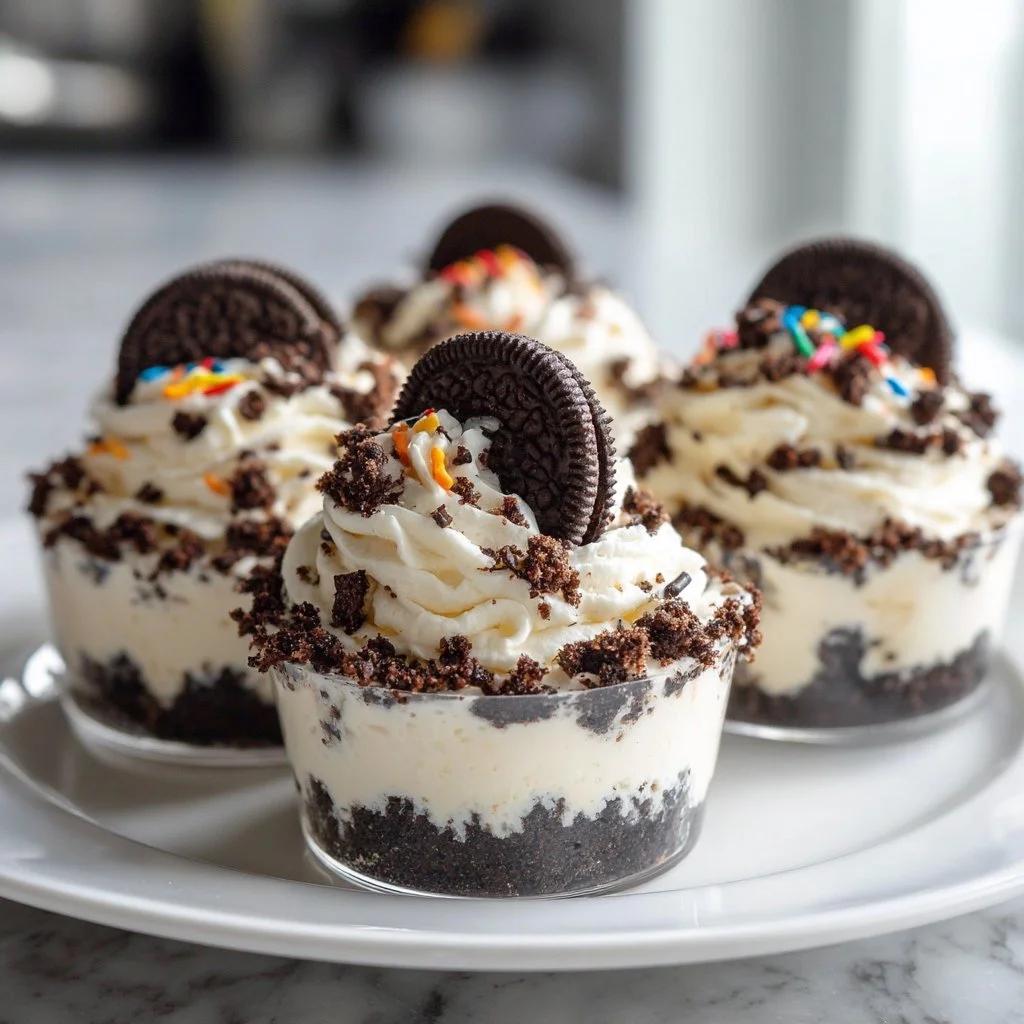
No-Bake Oreo Cheesecake Cups: A Cozy Delight You Won’t Forget
Hey there, flavor lovers! It’s Nina from RusticFlavor, and today we’re diving into one of my all-time favorite desserts: No-Bake Oreo Cheesecake Cups. 🍰✨ If you love simple, delicious treats that remind you of sweet moments and make your friends go “wow,” you’re in for a real treat!
A Sweet Slice of Nostalgia
Let me take you back for a moment. Picture a sunny afternoon in my childhood kitchen, filled with the scent of baked goods and laughter. My family would gather around the table, flipping through our cherished recipe cards, each one holding a story that was just as rich as the flavors we were about to enjoy. Maybe it’s those moments that inspired my love for creating comforting recipes, but one dessert always stood out—cheesecake!
Now, my mom had this classic cheesecake recipe that could make any holiday feel special. But let me tell you, it was a labor of love, with a crust that needed to be baked and a filling that required more than a pinch of patience. So, I set out to create a version that would capture all that nostalgia without the fuss. Enter: No-Bake Oreo Cheesecake Cups!
These little cups are creamy, dreamy, and come together in minutes. Plus, they’re adorable and perfect for sharing with family and friends. Ready to make some magic happen in your kitchen? Let’s gather our ingredients!
Ingredients
Here’s what you’ll need to whip up these delicious No-Bake Oreo Cheesecake Cups:
- 18 Oreo cookies
- These crunchy, chocolatey biscuits are the star of the show! Feel free to use any flavor of Oreo, like double-stuff or mint, for a fun twist!
- 3 tbsp melted butter
- Butter brings richness and helps bind the crust. If you’re looking for a dairy-free option, try using coconut oil instead!
- 8 oz cream cheese
- Softened at room temperature, this is the base of your cheesecake filling! If you’re vegan or dairy-free, creamy cashew cheese can make a great substitute!
- 1/2 cup powdered sugar
- This sweetens and helps to stabilize the filling. You could swap it for coconut sugar or a sugar alternative according to your taste.
- 1 tsp vanilla extract
- This adds a lovely depth of flavor. Use pure vanilla extract for the best taste; imitation just doesn’t compare!
- 1 1/2 cups whipped topping
- This gives your cheesecake that light and airy texture. If you prefer a homemade version, feel free to whip up your own cream!
- Mini Oreos for garnish
- These little cuties make the perfect topping. You can also use chocolate shavings or fresh berries for a pop of color!
Step-by-Step Instructions
Now that we have our ingredients ready, let’s dive into these easy steps to create our No-Bake Oreo Cheesecake Cups!
Step 1: Prepare the Oreo Crust
- Crush the Oreo cookies
- In a food processor or zip-top bag, crush the 18 Oreos into fine crumbs. Don’t worry about getting them too uniform; a few larger pieces add texture!
- Mix with melted butter
- In a mixing bowl, combine the crumbed Oreos with the melted butter. Stir until it looks like wet sand. This will be the base of our cups!
- Fill your cups
- Divide the Oreo mixture evenly among your serving cups or glasses, pressing down to create a compact layer. Give it some love; this crust is the bed for our luscious filling!
Step 2: Make the Cheesecake Filling
- Beat the cream cheese
- In a large bowl, beat the softened cream cheese until it’s smooth and creamy. The key here is patience—don’t rush this step or you might end up with lumps later!
- Add sugar and vanilla
- Mix in the powdered sugar and vanilla extract. Keep beating until well combined. Tasting here is essential; this is your moment to adjust sweetness!
- Fold in the whipped topping
- Gently fold in the whipped topping until zero streaks remain. The goal is to keep it light and airy—think clouds, not bricks!
Step 3: Assemble the Cups
- Fill your cups with the cheesecake mix
- Spoon the cheesecake mixture on top of your Oreo crust layers. You can use a piping bag for a fancier look or just a spoon for that rustic charm I adore!
- Chill the cups
- Cover the cups with plastic wrap and pop them in the fridge for at least 2-3 hours. This allows the flavors to meld and sets the cheesecake filling perfectly.
Step 4: Garnish and Serve
- Top with Mini Oreos
- Once chilled, pull those beauties out and finish off with mini Oreos on top. It’s the little finishing touches that tell your friends, “I put in effort, but really, that was easy!”
- Serve and Enjoy
- Scoop a spoonful and dig in! I love serving them straight from the fridge for that extra chill factor. You can even bring these to a picnic—just imagine the smiles!
Serving Suggestions
These delightful cups are versatile and easy to serve! Here are a couple of ways to present them:
- In individual mason jars for a rustic vibe.
- Use clear plastic cups for outdoor parties; they’re just as charming!
- Serve on a platter with drizzles of chocolate sauce or caramel to elevate the presentation—even a sprinkle of chopped nuts works wonders.
Recipe Variations
Feeling adventurous? Here are some ideas to spice things up:
- Nutella Swirl
- Add in a layer of Nutella to the cheesecake filling for a decadent chocolate-hazelnut twist!
- Fruit Fusion
- Top each cup with fresh strawberries, raspberries, or even a few banana slices for a fruity touch. It’s the perfect complement to the creaminess!
- Peppermint Delight
- Crush some peppermint candies and sprinkle them on top for a holiday homage! Just add peppermint extract in the filling for an extra kick.
- Peanut Butter Oreo Cups
- Mix in a layer of peanut butter in the cheesecake for that salty-sweet pairing that’s so irresistible!
- Coconut Bliss
- Top with toasted coconut for a tropical feel; add some coconut extract in the filling for a dreamy island vibe!
Chef’s Notes
As I created this recipe, I couldn’t help but think of all the times I’ve tried to recreate my mom’s cheesecake. Let me tell you, I’ve learned plenty about patience in the kitchen, but there’s something so satisfying about a quick dessert that still makes your heart feel full. My friends and family love it when I bring out these cups, and they’re always amazed that something so easy can taste so good.
Also, I have to chuckle at the first time I made these. I got so excited to share them that I forgot to chill them long enough! We had very soft cups that quickly deflated—a reminder that patience is sometimes key in the dessert department!
FAQs and Troubleshooting
Q1: Can I make these ahead of time?
Absolutely! You can prepare the cups the day before and keep them in the fridge; just hold off on garnishing until you’re ready to serve.
Q2: What if I don’t have whipped topping?
No worries! You can make your own by whipping heavy cream until soft peaks form—just be gentle when folding it into the cream cheese mixture!
Q3: My filling turned out lumpy—what did I do wrong?
It’s likely the cream cheese was too cold. Always ensure it’s softened properly to avoid lumps and help it mix beautifully!
Q4: How can I keep these from being too sweet?
Tone down the sweetness by reducing the powdered sugar or opting for a less sweet whipped topping. You could also add a little pinch of salt for balance!

Nutritional Info (Optional)
While I usually don’t dive deep into nutritional info, here’s a rough breakdown per cup (depends on your serving size):
- Calories: Approximately 320
- Fat: 22g
- Carbohydrates: 29g
- Protein: 4g
- Sugar: 18g
Remember, this dessert is all about indulgence, so enjoy every delicious bite without overthinking it!
And there you have it! A simple, fun recipe for No-Bake Oreo Cheesecake Cups that brings comfort and joy to any occasion. I hope this has inspired you to whip up a batch and share the love (and flavors) with your own friends and family. Keep it rustic, keep it flavorful, and keep shining that kitchen magic! 🥄✨
Until next time, happy cooking!
— Nina 🍲✨
PrintNo-Bake Oreo Cheesecake Cups
A delightful and easy dessert that combines creamy cheesecake filling with a crunchy Oreo crust, perfect for sharing with friends and family.
- Prep Time: 15 minutes
- Cook Time: 0 minutes
- Total Time: 180 minutes
- Yield: 4 servings 1x
- Category: Dessert
- Method: No-Bake
- Cuisine: American
- Diet: Vegetarian
Ingredients
- 18 Oreo cookies
- 3 tbsp melted butter
- 8 oz cream cheese
- 1/2 cup powdered sugar
- 1 tsp vanilla extract
- 1 1/2 cups whipped topping
- Mini Oreos for garnish
Instructions
- Crush the Oreo cookies in a food processor or zip-top bag until fine crumbs.
- Mix the crushed Oreos with melted butter in a mixing bowl.
- Fill your cups with the Oreo mixture, pressing down to create a compact layer.
- Beat the softened cream cheese in a large bowl until smooth and creamy.
- Add the powdered sugar and vanilla extract, mixing until well combined.
- Fold in the whipped topping gently until no streaks remain.
- Spoon the cheesecake mixture into the prepared cups on top of the Oreo crust.
- Chill the cups in the fridge for at least 2-3 hours to set.
- Top with mini Oreos just before serving.
- Serve and enjoy cold!
Notes
Allow enough time for the cups to chill to achieve the best texture. Variations include Nutella, fruit toppings, or even adding peanut butter for extra flavor.
Nutrition
- Serving Size: 1 cup
- Calories: 320
- Sugar: 18g
- Sodium: 300mg
- Fat: 22g
- Saturated Fat: 10g
- Unsaturated Fat: 8g
- Trans Fat: 0g
- Carbohydrates: 29g
- Fiber: 1g
- Protein: 4g
- Cholesterol: 35mg
Keywords: cheesecake, no-bake, dessert, Oreo, easy recipe