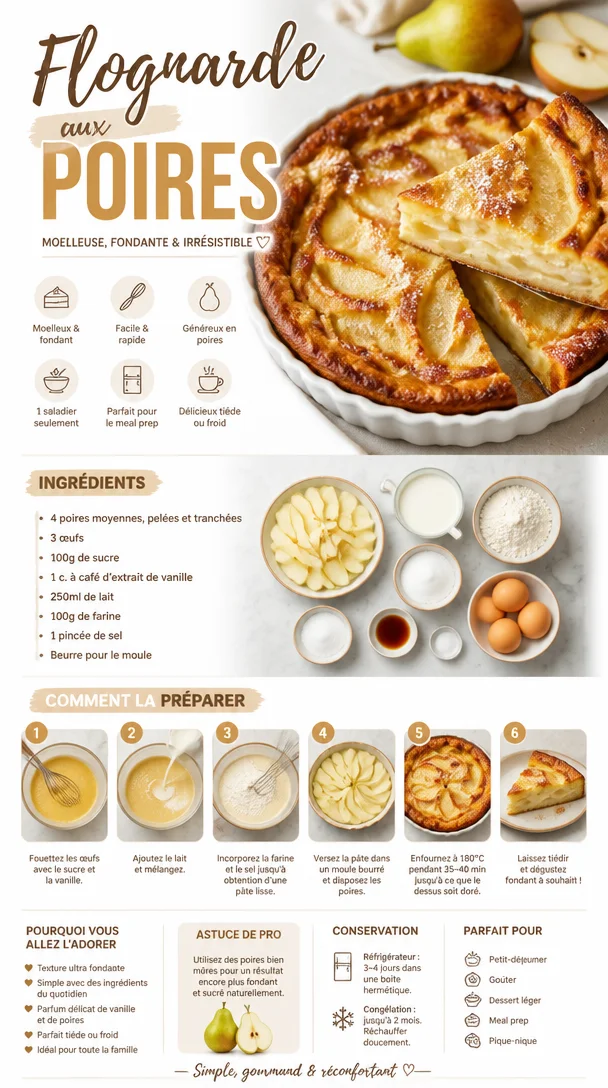
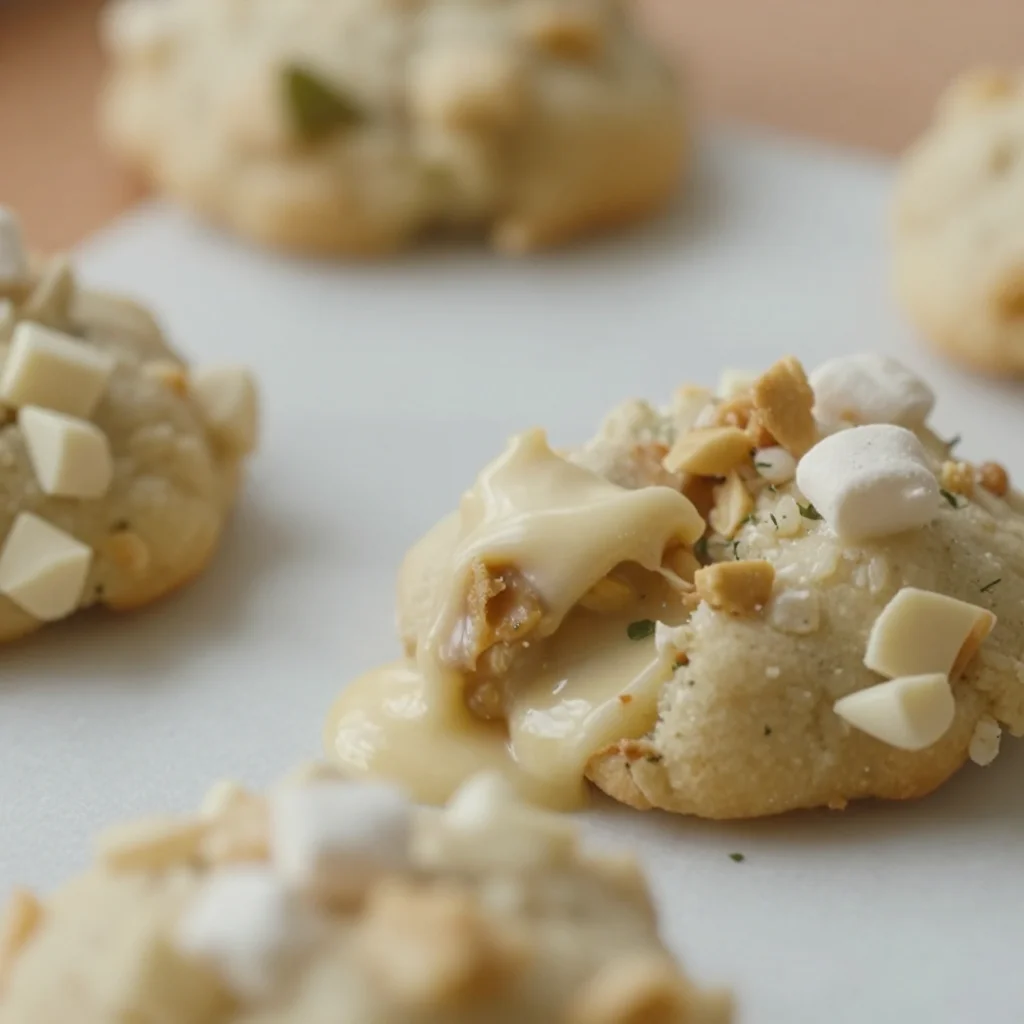
No-Bake Avalanche Cookies: A Sweet Trip Down Memory Lane
Hey there, fellow food lovers! It’s Nina here, and I can’t wait to share a delightful treat that’s as easy to make as it is delicious—No-Bake Avalanche Cookies! These little bites of heaven bring back so many juicy memories for me, and I’m excited to pass that nostalgia on to you. Pull up a chair, grab a warm cup of coffee, and let’s dive into the kitchen magic.
Personal Story: A Childhood Connection
Growing up, my kitchen was always filled with the tantalizing aroma of sweet and buttery treats. One of my absolute favorites was my grandmother’s no-bake cookies. I remember sitting on a stool, watching her mix together mouthwatering treats that would disappear faster than she could set them out to cool. Among these were her marvelous marshmallow creations—simple, quick, and loaded with fun!
Every holiday gathering, those soft, gooey treats would make an appearance, and my cousins and I would hover around, trying to snag the first bite (before the adults got to them!). It’s a cherished memory that embodies everything I love about cooking: bonding, laughter, and of course, scrumptious food! Today, I’ll be recreating that spirit with these Avalanche Cookies, which blend crunchy rice cereal, creamy peanut butter, and melty white chocolate. Let’s get started!
Ingredients
Here’s what you’ll need to create these chewy, crispy cookies:
- 2 cups rice cereal
- Think Rice Krispies or any similar brand! This cereal gives that delightful crunch. You can also try a gluten-free version if needed.
- 1 cup mini marshmallows
- These little gems add sweetness and a wonderful chewy texture that makes each bite pop. If you’re feeling adventurous, look for flavored marshmallows for a twist!
- 1 cup white chocolate chips
- Pure bliss in chip form! Good quality white chocolate will make a noticeable difference. If you’re dairy-free, you can swap in dairy-free chocolate chips.
- 1/2 cup peanut butter
- Smooth or crunchy—it’s all about preference! For a nut-free alternative, sun butter works beautifully, too.
- 1/2 cup powdered sugar
- This adds sweetness while helping to bind everything together. If you want a lighter option, try using coconut sugar, but your cookies might not be as sweet.
- 1 teaspoon vanilla extract
- This adds a lovely aroma and warmth to your cookies. Use pure vanilla extract for the best flavor!
Step-by-Step Instructions
Let’s bring these Avalanche Cookies to life! Here’s how you can easily whip them up:
-
Prepare Your Base:
- Start by gathering all your ingredients and a large mixing bowl. It’s essential to have everything at hand so you can dive right into mixing without any interruptions. Plus, it keeps your kitchen a little tidier!
-
Melt the Peanut Butter and Chocolate:
- In a microwave-safe bowl, combine the peanut butter and white chocolate chips. Microwave them in 20-30 second increments, stirring in between, until melted and smooth. I like to keep an eye on it to make sure nothing burns—trust me, scorched chocolate is heartbreak city!
-
Add Vanilla and Sweetness:
- Once your peanut butter and chocolate mixture is velvety, whisk in the vanilla extract and powdered sugar. The powdered sugar will not only sweeten the mixture but also help thicken it up for better cookie formation.
-
Mix in Cereal and Marshmallows:
- Now, gently fold in the rice cereal and mini marshmallows. Use a spatula to combine everything; you want to make sure every puff of cereal is coated in that creamy bliss. It can get a little sticky, but that’s part of the fun! If you’d like a bit of extra crunch, feel free to fold in some chopped nuts!
-
Shape Your Cookies:
- Line a baking sheet with parchment paper. Using a spoon or your fingers, scoop out small portions of the mixture and form them into mounds on the sheet. They don’t need to be perfect—rustic is the name of the game here!
-
Chill to Set:
- Pop the baking sheet into the fridge for about 30 minutes to an hour, or until the cookies firm up. The waiting can be the hardest part, but trust me—it’s worth it!
-
Enjoy with Friends:
- Once they’re set, dig in! Serve them up on a platter and watch your guests’ smiles light up. Feel free to indulge in one (or three); I won’t tell if you don’t!
Serving Suggestions
There’s nothing quite like a warm cookie, but to elevate your serving game, here are a few ideas:
- Chocolate Drizzle: Melt some extra white or dark chocolate and drizzle it over the cookies for a gorgeous touch.
- Sprinkle Fest: Toss some festive sprinkles on top before the chocolate sets for a pop of color—perfect for birthdays or holidays!
- Coffee Companion: Pair these delightful cookies with a hot cup of coffee or chocolate milk. The creaminess really complements the sweetness.
Recipe Variations
Feel like mixing it up a bit? Here are some fun twists you can try with your Avalanche Cookies:
-
Add a Crunch: Mix in some chopped nuts (like peanuts or almonds) or crushed pretzels for an extra salty-sweet combo!
-
Use Different Chocolate: Swap the white chocolate chips for milk or semi-sweet chocolate for a rich flavor variation.
-
Flavors of Fall: Add a pinch of cinnamon or nutmeg for a cozy, autumn vibe. You can feel the warmth just thinking about it!
-
Go Tropical: Mix in some dried coconut flakes or freeze-dried fruits like strawberries for a refreshing twist that transports you to a sunny beach!
-
Peanut Butter Swirl: For the peanut butter lovers, add in another layer by swirling in some extra peanut butter right before setting!
Chef’s Notes
In my kitchen, recipes are living things. This no-bake cookie idea has evolved so much over the years! I remember experimenting with different cereals and snacks—like corn flakes or even Cheerios—which added fun textures and flavors.
The best part? There’s no way to go wrong with these cookies! They are forgiving and adaptable, which is what rustic cooking is all about. Embrace the messiness; cooking should be fun, after all!
And remember, if you ever find yourself in a sticky situation in the kitchen, just laugh it off. One time, I ended up using baking soda instead of powdered sugar! Let me tell you, they were quite the experiment. Thankfully, I had enough ingredients to whip up another batch. Lesson learned—always read the labels!
FAQs and Troubleshooting
-
What if my mixture is too gooey?
If it feels too sticky, you can always add a bit more powdered sugar or rice cereal to balance it out. Just incorporate it slowly until you reach the right consistency. -
Can I use regular marshmallows?
Absolutely! You can use regular marshmallows, but mini ones melt and blend in better with the mix for that perfect gooey texture. -
How long do these cookies last?
They can be stored in an airtight container in the fridge for up to a week—if they last that long! I doubt they will, though; they’re too good! -
Can I freeze these cookies?
Yes, you can freeze them! Just place them in a freezer-safe container with parchment paper in between layers to avoid sticking. They last for about 3 months in the freezer.
Nutritional Info
While I don’t usually focus on nutritional info for my comfort food, it’s always good to be aware! Keep in mind these cookies are rich, sweet treats, so moderation is key. Each cookie is approximately 120 calories, mainly from sugars and fats. For a more accurate count, consider dividing the total calories based on how many cookies you create.
Conclusion
There you have it! No-Bake Avalanche Cookies—a sweet treat that not only tickles your taste buds but also warms your heart through memories of cozy kitchens and family gatherings. They’re incredibly easy to whip up and perfect for sharing with friends or keeping all to yourself (I won’t judge!).
As you explore these flavors in your own kitchen, remember that cooking is all about connection—of flavors, of stories, and of people. Share your creations with family, bring them to potlucks, and maybe even create some new memories of your own!
Thanks for joining me on this delicious journey. Now go ahead, make those cookies, and let the sweetness fill your home! Happy cooking! 🍪✨
PrintNo-Bake Avalanche Cookies

Delightful no-bake cookies that combine crunchy rice cereal, creamy peanut butter, and melty white chocolate for a sweet treat.
- Prep Time: 10 minutes
- Cook Time: 0 minutes
- Total Time: 40 minutes
- Yield: 12 servings 1x
- Category: Dessert
- Method: No-Bake
- Cuisine: American
- Diet: Vegetarian
Ingredients
- 2 cups rice cereal
- 1 cup mini marshmallows
- 1 cup white chocolate chips
- 1/2 cup peanut butter
- 1/2 cup powdered sugar
- 1 teaspoon vanilla extract
Instructions
- Prepare your base: Gather all your ingredients and a large mixing bowl.
- Melt the peanut butter and chocolate: Combine in a microwave-safe bowl and microwave in increments until melted and smooth.
- Add vanilla and sweetness: Whisk in vanilla extract and powdered sugar to the melted mixture.
- Mix in cereal and marshmallows: Gently fold in the rice cereal and mini marshmallows.
- Shape your cookies: Scoop small portions onto a parchment-lined baking sheet.
- Chill to set: Refrigerate for 30 minutes to an hour until firm.
- Enjoy with friends: Serve and indulge in these delightful treats!
Notes
The mixture can be adjusted with additional powdered sugar or rice cereal if too gooey. Can be frozen for up to 3 months.
Nutrition
- Serving Size: 1 cookie
- Calories: 120
- Sugar: 14g
- Sodium: 120mg
- Fat: 6g
- Saturated Fat: 2.5g
- Unsaturated Fat: 3g
- Trans Fat: 0g
- Carbohydrates: 16g
- Fiber: 0g
- Protein: 2g
- Cholesterol: 0mg
Keywords: no-bake cookies, sweet treats, peanut butter dessert, chocolate cookies, family recipe