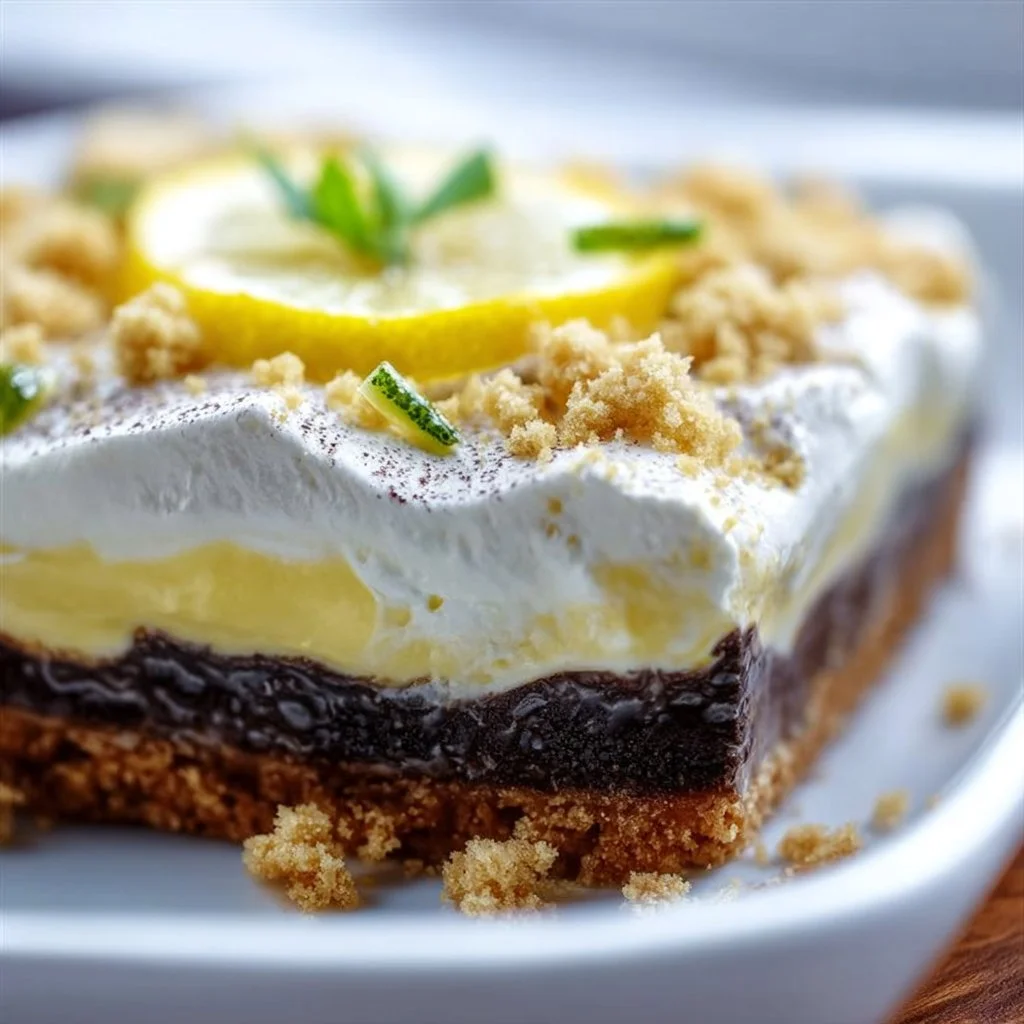
Heavenly Oreo Lemon Dessert: A Slice of Nostalgia with a Twist
Hello, fellow food lovers! 🌟 Nina here, and today I’m bursting with excitement to share one of those magical dessert recipes that’s guaranteed to bring sunshine to your kitchen and smiles to your table. This Heavenly Oreo Lemon Dessert is the perfect blend of creamy, crunchy, and tangy flavors that will transport you straight to a warm, sunny day — or at least to your fondest dessert memories!
A Taste of Nostalgia
Before we dive into the recipe, let me take you back to a cherished moment in my kitchen memory bank. I vividly remember spending lazy summer afternoons with my grandmother. The sun soaked the kitchen in golden light while the air was filled with the sweet scent of citrus and cookies. She had an old, handwritten recipe book full of neatly crafted notes, and we often experimented with flavors, combining her classic, rustic recipes with my own quirky twists.
One day, we decided to try something a little different. As she crushed a bag of Oreos for a pie crust, I excitedly suggested we add a zesty lemon layer on top. We giggled as the familiar crunch of the cookies met the bright, refreshing flavor of lemon. It was a hit! This dessert became our little secret, a combination we cherished and shared during family gatherings. Fast forward to today, and I’m thrilled to pass on this delightful recipe — with a few modern touches!
Ingredients
Let’s gather our ingredients, shall we? Here’s what you’ll need to whip up this delectable dessert:
-
24 Oreo cookies, crushed: The backbone of this dessert! They add a rich, chocolaty flavor and a satisfying crunch. You can substitute with any chocolate sandwich cookies if you’re feeling adventurous!
-
1/2 cup butter, melted: This helps bind the crust together and enriches the flavor. If you’re looking for a healthier option, try using coconut oil instead for a subtle coconut taste.
-
8 oz cream cheese, softened: Cream cheese provides that creamy texture we all crave. If you need a dairy-free option, look for vegan cream cheese, which works beautifully!
-
1 cup powdered sugar: This sweetens the dessert and adds to the luscious creaminess. For a lower-sugar option, you can use powdered monk fruit sweetener as a substitute.
-
1 cup whipped cream: Whipped cream lightens the mixture and creates a dreamy texture. If you want to skip the heavy cream, use a coconut whipped topping for a dairy-free version.
-
1/4 cup lemon juice: Freshly squeezed, of course! It adds brightness and tanginess. Bottled lemon juice is fine in a pinch, but fresh is always best!
-
1 teaspoon lemon zest: This will add an extra punch of lemon flavor without the acidity. If you’re out of lemons, a hint of orange zest can be a tasty substitute.
Step-by-Step Instructions
Ready to get cooking? Let’s do this!
-
Preheat the Oven: Start by preheating your oven to 350°F (175°C). This ensures that your crust will come together beautifully and bake evenly.
-
Make the Oreo Crust: In a medium bowl, combine the crushed Oreos and melted butter. Mix until the crumbs are fully coated. This will create a moist crumbly texture. Press the mixture into the bottom of a 9-inch pie dish or an 8×8 baking dish for a thicker slice. Use the back of a measuring cup to press it down firmly — a little elbow grease goes a long way in making a solid crust!
-
Bake the Crust: Place your crust in the oven and bake for 10 minutes, until set. This will help it hold together once we add the filling. Keep an eye on it — you want it slightly crispy, not burnt!
-
Mix the Cream Cheese Layer: In a large mixing bowl, beat the softened cream cheese and powdered sugar together until smooth. Using a hand mixer or stand mixer gives it that cloud-like texture! It should be creamy and free of lumps.
-
Add Lemon Goodness: Next, blend in the lemon juice and lemon zest. The mixture should start to smell heavenly. Fold in the whipped cream gently until just combined. This keeps the filling light and airy.
-
Layer & Chill: Once your crust has cooled, spread the cream cheese filling evenly on top. Smooth it out with a spatula for a polished look. Cover your dessert with plastic wrap or aluminum foil and pop it in the fridge for at least 4 hours, or overnight if you can resist. This step is crucial to set everything perfectly!
-
Serve Up the Slices: When you’re ready to serve, simply slice into squares and enjoy! For an extra touch, you can top each slice with more whipped cream and a sprinkle of crushed Oreos or a twist of lemon peel for some pizzazz.
Serving Suggestions
This Heavenly Oreo Lemon Dessert is versatile, making it easy to adapt for any occasion. Serve it chilled on a warm summer evening after a barbecue, or bring it to holiday potlucks to wow your friends and family. Pair it with a scoop of vanilla ice cream for a delightful contrast of temperatures, or a side of fresh berries for a refreshing touch. Trust me, this dessert will be the star of the show!
Recipe Variations
Feeling adventurous? Here are a few fun twists you might enjoy:
-
Add Fresh Berries: Fold in some raspberries or blueberries into the cream cheese mixture for a burst of color and flavor. The tartness of the berries pairs beautifully with the lemon.
-
Chocolate Layer: For all the chocolate lovers out there, try adding a layer of chocolate pudding on top of the cream cheese mixture before it sets. Yum!
-
Coconut Twist: Add shredded coconut to the crust or mix it into the cream cheese layer for a tropical touch.
-
Swap the Lemon: If you’re not a fan of lemon, swap it out for lime juice and zest for a refreshing lime dessert!
-
Nutty Delight: Mix in some chopped nuts, like almonds or walnuts, into the crust for an added crunch and nutty flavor.
Chef’s Notes
I can’t help but smile when I think about all the variations we used to create in my grandmother’s kitchen. She was a pro at fusing flavors together, and I can assure you, it always made for a happy family meal. This Oreo Lemon Dessert has come a long way from that summer afternoon of experimentation, but it still holds the same warmth and love that we baked into every bite. If you’re ever in doubt, remember: cooking is all about experimenting and making it your own!
FAQs and Troubleshooting

1. Can I make this dessert ahead of time?
Absolutely! In fact, refrigerating it overnight helps the flavors meld beautifully. Just be sure to cover it securely to avoid any fridge odors.
2. How do I store leftovers?
Keep any leftovers in the fridge, covered. They should last for about 3 to 4 days. Although, I can’t guarantee they’ll stick around that long!
3. What if my cream cheese mixture isn’t smooth?
Make sure the cream cheese is room temperature for easier blending. If your mixture still has lumps, continue mixing until the texture is creamy and smooth.
4. Can I freeze this dessert?
Yes, you can! Just make sure to wrap it tightly in plastic wrap and then in aluminum foil. When ready to serve, let it thaw in the fridge overnight.
Nutritional Info
(Optional but helpful. Add details here based on the specific serving size, calories, sugars, fat, etc.)
And there you have it! From the warmth of my kitchen to yours, I hope you enjoy making this Heavenly Oreo Lemon Dessert as much as I do. Remember, food is not just about nourishment; it’s about the stories we share around the table and the memories that linger long after the dishes are washed. Happy cooking! 🍽️✨

Heavenly Oreo Lemon Dessert

A delightful blend of creamy, crunchy, and tangy flavors perfect for any occasion.
- Prep Time: 15 minutes
- Cook Time: 10 minutes
- Total Time: 240 minutes
- Yield: 12 servings 1x
- Category: Dessert
- Method: Refrigeration
- Cuisine: American
- Diet: Vegetarian
Ingredients
- 24 Oreo cookies, crushed
- 1/2 cup butter, melted
- 8 oz cream cheese, softened
- 1 cup powdered sugar
- 1 cup whipped cream
- 1/4 cup lemon juice
- 1 teaspoon lemon zest
Instructions
- Preheat the oven to 350°F (175°C).
- Combine the crushed Oreos and melted butter in a medium bowl until fully coated.
- Press the mixture into the bottom of a 9-inch pie dish or an 8×8 baking dish.
- Bake the crust for 10 minutes until set.
- Beat the softened cream cheese and powdered sugar together in a large mixing bowl until smooth.
- Add the lemon juice and lemon zest, then fold in the whipped cream gently until combined.
- Spread the cream cheese filling evenly over the cooled crust.
- Cover the dish with plastic wrap or aluminum foil and refrigerate for at least 4 hours.
- Slice into squares and serve with additional whipped cream and crushed Oreos on top.
Notes
For a twist, try incorporating fresh berries or a chocolate layer.
Nutrition
- Serving Size: 1 square
- Calories: 250
- Sugar: 20g
- Sodium: 250mg
- Fat: 14g
- Saturated Fat: 8g
- Unsaturated Fat: 4g
- Trans Fat: 0g
- Carbohydrates: 30g
- Fiber: 1g
- Protein: 4g
- Cholesterol: 30mg
Keywords: Oreo dessert, lemon dessert, creamy dessert, easy dessert, no-bake dessert