A Spooktacular Treat: Haunted House Cake Recipe
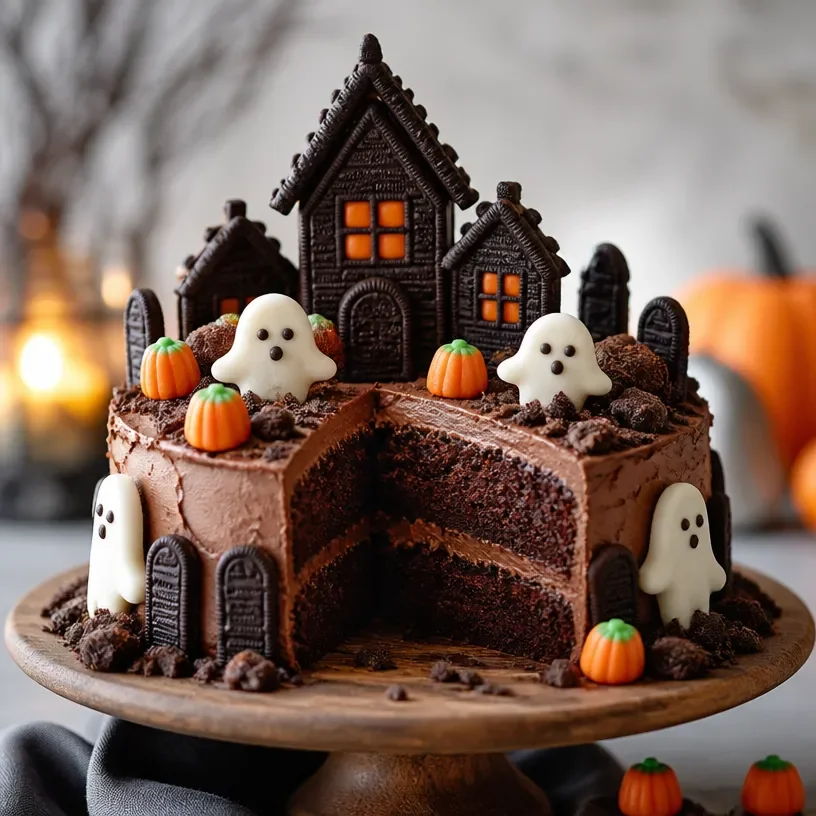
As the leaves turn golden and the air gets crisp, there’s a certain magic that starts to fill our homes—the delightful, slightly eerie atmosphere of Halloween! It’s that time of year when we can embrace the quirky, the whimsical, and just a little bit spooky. Today, I’m thrilled to guide you through creating the ultimate Haunted House Cake that’s perfect for Halloween parties, family gatherings, or simply to indulge your sweet tooth.
What’s even better? This isn’t just any cake; it’s a rich chocolatey masterpiece topped with some fun decorations that will make both kids and adults squeal with delight! So, let’s roll up our sleeves and dive into this cozy kitchen adventure.
My Spooky Kitchen Memory
Years ago, I remember racing home from school, eager to join my family in preparing for Halloween. My mom was always a whiz in the kitchen, and every year she’d transform our dining room table into a hub of creativity sprinkled with chocolate and laughter. One particular year, she whipped up a ghostly chocolate cake adorned with ghoulish decorations. I was in charge of making the “gravestones” out of cookies, and it felt like I was taming the wildest of monsters in the kitchen!
As the evening approached, our home filled with guests dressed in costumes, reveling in the fun of the night—there was energy, laughter, and, of course, delicious treats. That memory has always stuck with me, reminding me of how food can bring us together, especially when it’s infused with love and a dash of spooky spirit!
The Haunted House Cake Recipe
Ready to create some Halloween magic? Here’s what you’ll need:
Ingredients
-
2 chocolate cake layers
Rich, decadent chocolate cake makes the perfect foundation for our haunted house. You can use your favorite recipe or a boxed mix for convenience. It’s all about making it just right for your celebration! -
Chocolate buttercream frosting
Silky and smooth, this frosting is what holds everything together. Plus, it tastes amazing! If you want to lighten it, consider a cream cheese frosting. -
Chocolate sandwich cookies
These iconic cookies can serve as your “graveyard” base or even as delightful gravestones. If you’re looking for a gluten-free option, swap them out for chocolate rice cakes or gluten-free cookies. -
Candy pumpkins
Cute and colorful, these little decorations add some fun! If you can’t find candy pumpkins, go for gummy worms or even small chocolate bats. -
Gummy ghosts
These adorable little oozers are essential for our haunted vibes! If you prefer, you can swap them for marshmallow ghosts instead.
Step-by-Step Instructions
-
Preheat and Prepare
Preheat your oven to 350°F (175°C). If you’re using cake pans, grease and flour them, or you can line them with parchment paper for easy removal later. It’s all about keeping it simple and ensuring your cake comes out perfectly! -
Bake Your Cakes
Pour your cake batter into the prepared pans, dividing it evenly. Bake for about 30-35 minutes or until a toothpick inserted in the center comes out clean. As the aroma of chocolate fills your kitchen, just remember, patience is key. -
Let Them Cool
Once you’ve successfully baked those layers, allow them to cool in the pans for about 10 minutes. Then, carefully turn them out onto a wire rack to cool completely. Here’s a tip: don’t rush this step; a warm cake may crumble! -
Whip Up the Buttercream Frosting
In your mixing bowl, beat together butter and confectioner’s sugar until it’s airy and fluffy. Add cocoa powder for that chocolatey punch and a splash of milk until you achieve your desired consistency. Remember to taste as you go—it’s a delicious job, and you deserve a little treat! -
Start Assembly
Place one chocolate layer on your cake stand or serving plate. Spread a generous layer of frosting on top. Then, carefully place the second layer on top and continue smothering the entire cake in frosting. Get creative with your frosting technique! You could even use a spatula to create “spooky” swirls and peaks—just like the ghostly vibe. -
Decorate Like a Pro!
Now comes the fun part! Crush a few chocolate sandwich cookies into crumbs and sprinkle them around the base of the cake to mimic earth or dirt. Then, using a little frosting, attach the candy pumpkins and gummy ghosts to the top. -
Final Touch
For an extra-spooky effect, consider using a spider web candy garnish or edible glitter. Present your haunted cake like a true masterpiece and watch as jaws drop!
Serving Suggestions
To serve, slice generous pieces and plate them with a few extra candy decorations. Pair it with a scoop of vanilla ice cream or a drizzle of hot fudge for an extra indulgent treat. Maybe even brew up a spooky punch on the side to complete the festive experience!
Recipe Variations
-
Spiced Pumpkin Layer
Swap one of the chocolate layers for a spiced pumpkin cake to embrace the fall flavors. It’ll blend beautifully with the chocolate! -
Add Some Crunch
Fold in chopped nuts like walnuts or pecans into the buttercream for added texture. Crunchy layers add such an exciting twist! -
Vegan Option
Use plant-based substitutions like flaxseed for eggs, coconut oil for butter, and almond milk for traditional milk for a delightful vegan treat. -
Drizzled Caramel
Drizzle some caramel sauce over the top before placing the decorations for that sweet, delicious contrast—yum! -
Coffee Flavor
Add a teaspoon of instant coffee to the batter for a delightful mocha flavor that pairs perfectly with chocolate. It adds depth you’ll love!
Chef’s Notes
I’ll let you in on a little secret: this cake is not just for Halloween. Change the decorations, and it can be a birthday cake, a holiday treat, or just an “I need chocolate” moment. Just remember, the joy is in the journey.
One of my fondest memories is when I made this cake for a friend’s Halloween party. I decided to play with the spooky decorations and added some homemade chocolate spiders. Let me tell you, that was an adventurous bake, but I couldn’t stop smiling at how everyone loved it!
FAQs and Troubleshooting
-
Why did my cake sink in the middle?
This could happen for several reasons! Make sure you didn’t overmix the batter, and keep an eye on the baking time. -
How do I fix a crumbly cake?
If your cake crumbles while frosting, just chill it in the fridge for a while to firm it up. You could also use extra frosting to fill in the gaps. -
Can I make this ahead of time?
Absolutely! You can bake the layers in advance and store them in the freezer. Just frost it closer to your serving time to keep it fresh. -
What if I don’t have all the decorations?
No worries! Use what you have; the key is to have fun with it! You can even create a spooky scene using whatever candies are around.
Nutritional Info
For those curious about the nutrition, keep in mind that each slice (depending on the serving size) packs in delightful calories filled with fun! While it’s a treat, moderation is key. Indulging in something sweet during festive seasons is always a joy!
So there you have it, my friends! A Haunted House Cake that’s not only bursting with flavor but also filled with nostalgia and festive cheer. Grab your loved ones, get that apron on, and let the Halloween fun begin. May your Halloween be spooky, sweet, and full of delicious memories! 🕷️🍰✨
PrintHaunted House Cake
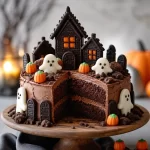
A rich chocolatey cake decorated for Halloween, perfect for parties and gatherings.
- Prep Time: 30 minutes
- Cook Time: 35 minutes
- Total Time: 65 minutes
- Yield: 12 servings 1x
- Category: Dessert
- Method: Baking
- Cuisine: American
- Diet: Vegetarian
Ingredients
- 2 chocolate cake layers
- Chocolate buttercream frosting
- Chocolate sandwich cookies
- Candy pumpkins
- Gummy ghosts
Instructions
- Preheat your oven to 350°F (175°C) and prepare the cake pans.
- Pour your cake batter into the prepared pans and bake for 30-35 minutes.
- Allow the cakes to cool in the pans for 10 minutes, then turn them out onto a wire rack.
- Beat together butter and confectioner’s sugar for the frosting, adding cocoa powder and milk as needed.
- Place one chocolate layer on your serving plate and frost the top.
- Add the second layer and continue frosting the entire cake.
- Crush chocolate sandwich cookies for decoration and attach candy pumpkins and gummy ghosts.
- For an extra-spooky effect, consider garnishing with spider web candy.
Notes
This cake can be customized for various occasions by changing decorations.
Nutrition
- Serving Size: 1 slice
- Calories: 400
- Sugar: 38g
- Sodium: 260mg
- Fat: 18g
- Saturated Fat: 9g
- Unsaturated Fat: 7g
- Trans Fat: 0g
- Carbohydrates: 52g
- Fiber: 2g
- Protein: 4g
- Cholesterol: 30mg
Keywords: Halloween, cake, dessert, spooky cake, haunted house, chocolate cake