Whip Up Some Magic: Chocolate Witch Broomsticks Recipe
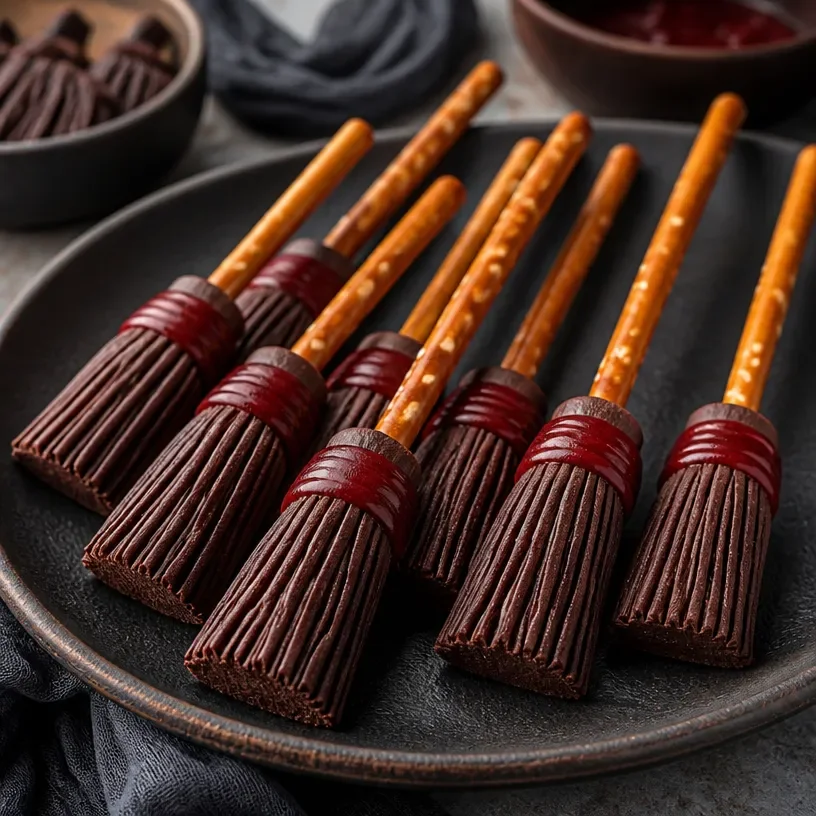
Welcome, fellow foodies! 🎃 Today, we’re diving into a wickedly fun treat that’s perfect for Halloween, parties, or just a cozy night in with family. It’s my delightful Chocolate Witch Broomsticks! Not only are these charming broomsticks delicious, but they also bring a sprinkle of nostalgia and joy to the kitchen. So, grab your apron, a cup of coffee, and let’s conjure up some magic!
A Trip Down Memory Lane
Ah, Halloween! What a mystical time of year. I remember as a kid, every October, I would eagerly look forward to crafting cute decorations, brewing up spooky treats, and, of course, donning my favorite witch costume. One year, my grandmother surprised me with these adorable “broomsticks” made from chocolate-covered snacks. They were so simple and yet delighted me beyond measure! We spent the evening creating new spooky creations, and the kitchen was filled with laughter, warmth, and yes, the rich aroma of chocolate.
Every time I whip up this recipe, I think of those cozy moments spent with my grandma. It’s a reminder that the best meals (or treats, in this case) come from the heart—just like my RusticFlavor mission. Let’s create some unforgettable memories together!
Get Ready with Your Ingredients
Before we get started, here’s what you’ll need to make these scrumptious broomsticks:
-
12 chocolate wafer cookies
These will serve as the broom head. You can use any chocolate wafer brand you prefer, or even try vanilla wafers for a twist! -
12 pretzel sticks
The sturdy handle of our broom! If you’re gluten-free, use gluten-free pretzels, or if you’re feeling adventurous, go for chocolate-covered pretzels to add an extra layer of flavor. -
Chocolate frosting
You can buy your favorite pre-made frosting or whip up a batch at home for a homemade touch. It’s sticky and delicious, perfect for holding everything together. -
Fruit leather strips (in brown or orange)
These will act as the broom bristles! If you can’t find fruit leather, feel free to substitute with shredded coconut or even cut-up chewy candy.
Now that we’ve got our magical ingredients ready, let’s get started on creating these treats!
Step-by-Step Instructions
Step 1: Prepare Your Workstation
Start by setting up a clean and spacious area in your kitchen. Grab a baking sheet or a large plate to assemble your broomsticks. Prepping your space makes everything feel smoother, and trust me, it’s all in the details!
Step 2: Assemble the Broomsticks
-
Take a pretzel stick and carefully dip one end into the chocolate frosting. This will be the ‘glue’ that holds your broom together.
- Chef Tip: Make sure to coat it quite well; it’s what will keep your broom head from flying off!
-
Press the chocolate wafer cookie firmly onto the frosting-covered end of the pretzel. Hold it for about 10 seconds to let it adhere.
- Hack: If you’re dealing with warm fingers on a hot day, consider chilling the cookies before starting!
-
Repeat this process until you’ve assembled all 12 broomsticks. Arrange them neatly on your baking sheet or plate.
- Chef Insight: Don’t worry if they look a little wonky—those imperfections make them all the more charming!
Step 3: Add the Bristles
-
Now for the fun part! Cut strips of your fruit leather into little pieces, about 1 inch wide.
- Wrap a strip around the area where the wafer cookie meets the pretzel, then secure it with a dab of chocolate frosting.
- Cooking Tip: If your fruit leather is too stiff, warm it slightly by rubbing it between your fingers to make it more pliable.
-
Also, feel free to get creative! You can layer multiple strips to give your broomstick a fuller, more whimsical look.
- Chef Note: A colorful mix can really add to the fun—let those creative juices flow!
Step 4: Let Them Set
- Allow the broomsticks to sit at room temperature for at least 30 minutes or pop them in the refrigerator for quicker setting.
- Pro Tip: If you’d like, drizzle some more chocolate frosting over them for an extra chocolatey touch!
Serving Suggestions
Time to impress your friends! Arrange these delightful broomsticks on a festive platter, surrounding them with some Halloween-themed candies or even mini pumpkins for that perfect autumnal vibe. You can also add a sprinkle of edible glitter for a little sparkle. 🌟
For a fun activity, set up a DIY broomstick-making station at your next Halloween gathering—let your guests enjoy the crafting experience with their own interpretations!
Recipe Variations
Let’s think outside the cauldron! Here are some creative twists you can try:
-
Swap the Cookies: Use vanilla wafer cookies for a lighter flavor, or even try flavored cookies like peanut butter for an exciting twist!
-
Different Handles: Instead of pretzel sticks, use skinny breadsticks or even candy sticks for a sweet treat.
-
Healthier Options: Choose dark chocolate wafers and organic fruit leather to give it a healthier flair while keeping it delicious.
-
Nutty Additions: Sprinkle some crushed nuts onto the chocolate frosting before adding the fruit leather for a crunchy broomstick!
-
Festive Themes: Change the fruit leather to different colors to create themed broomsticks for birthdays, movie nights, or even back-to-school!
Chef’s Notes
One of the best parts about making these Chocolate Witch Broomsticks is how versatile they are! This recipe can evolve to match whatever mood or occasion you’re celebrating. I remember one Halloween, I experimented by adding tiny candy eyeballs to make my broomsticks "come to life." The kids went wild for them!
And let’s be real—this recipe is just plain fun. It’s a reminder that cooking doesn’t have to be serious; it can be about joy, laughter, and bringing people together.
FAQs and Troubleshooting
1. My frosting isn’t sticking! What did I do wrong?
No worries! Make sure your frosting is at room temperature; if it’s too stiff, try to soften it a little by mixing in a few drops of warm water.
2. Can I make these ahead of time?
Absolutely! Just store them in an airtight container for up to 3 days. The fruit leather might get a little soggy, but they’ll still be delicious!
3. What if I can’t find fruit leather?
If fruit leather is hard to come by, feel free to substitute it with shredded coconut for a spooky, witchy look!
4. Will these broomsticks last long?
They are best enjoyed fresh, but they’ll last covered in the fridge for about a week. Just ensure they’re well-stored!
Nutritional Info
Note: Exact nutritional information varies based on brands and specific ingredient choices, so adjust according to your preferences!
- Calories: Approximately 150-200 calories per broomstick
- Fat: 8g
- Carbohydrates: 20g
- Protein: 1g
- Sugar: 10g
So there you have it, your complete guide to whipping up Chocolate Witch Broomsticks! Whether you’re making them for a party, a cozy family gathering, or simply because they bring a smile to your face, these broomsticks are sure to enchant everyone who tries them.
Remember, the heart of cooking lies in the love and joy we share, and I hope this recipe adds a sprinkle of magic to your kitchen!
Happy haunting, and let’s keep that love for cooking growing! 🍂✨
PrintChocolate Witch Broomsticks
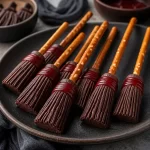
Delightful chocolate-covered broomsticks perfect for Halloween or any festive gathering.
- Prep Time: 15 minutes
- Cook Time: 30 minutes
- Total Time: 45 minutes
- Yield: 12 servings 1x
- Category: Dessert
- Method: No Bake
- Cuisine: American
- Diet: Vegetarian
Ingredients
- 12 chocolate wafer cookies
- 12 pretzel sticks
- Chocolate frosting
- Fruit leather strips (in brown or orange)
Instructions
- Prepare Your Workstation: Set up a clean area with a baking sheet or plate.
- Assemble the Broomsticks: Dip one end of a pretzel stick in chocolate frosting, press onto a wafer cookie, and hold for 10 seconds.
- Add the Bristles: Cut fruit leather into strips and wrap around where wafer meets pretzel, securing with frosting.
- Let Them Set: Allow to sit at room temperature for 30 minutes or refrigerate for quicker setting.
Notes
Consider adding a drizzle of chocolate frosting before serving for an extra treat.
Nutrition
- Serving Size: 1 broomstick
- Calories: 175
- Sugar: 10g
- Sodium: 150mg
- Fat: 8g
- Saturated Fat: 4g
- Unsaturated Fat: 2g
- Trans Fat: 0g
- Carbohydrates: 20g
- Fiber: 1g
- Protein: 1g
- Cholesterol: 0mg
Keywords: Halloween, treats, dessert, chocolate, fun, kids, festive