Spooktacular Mummy Oreo Balls: A Sweet Treat for Halloween
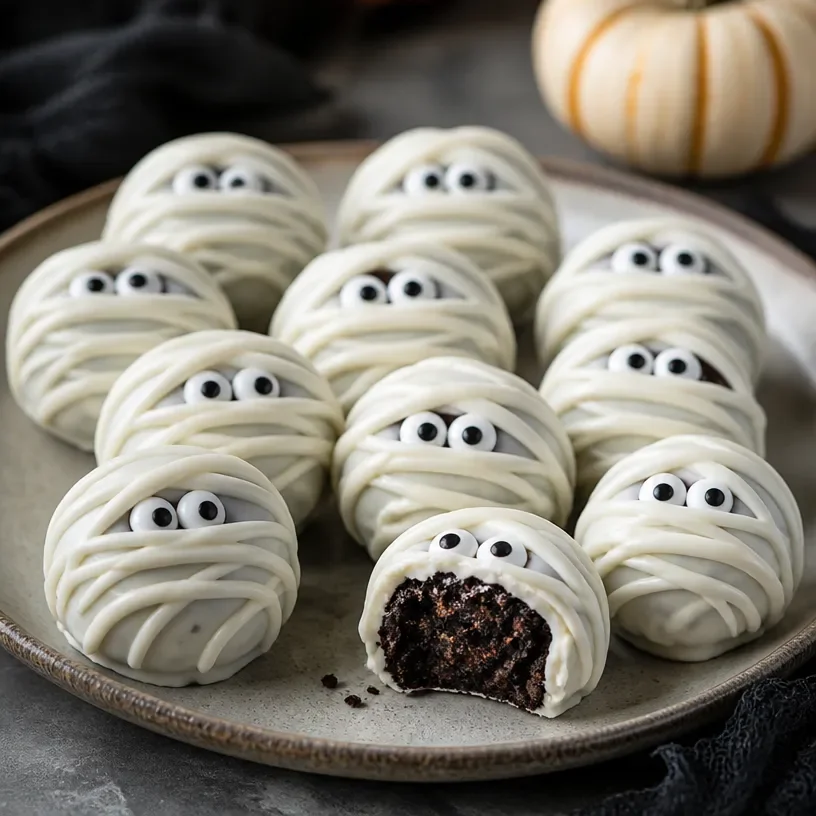
Hey there, food lovers! 🍭 It’s Nina from RusticFlavor, and today, we’re diving into a spooky yet delightful treat that’s perfect for Halloween: Mummy Oreo Balls. These yummy little bites are not only incredibly simple to make, but they also pack a punch in flavor and fun!
Now, let me tell you, these spooky bites are often a hit at any Halloween gathering. Whether you’re planning a big party or just want to surprise your family with some fun treats, these Mummy Oreo Balls are bound to bring smiles and deliciousness all around. So, grab your apron, and let’s get started!
A Sweet Walk Down Memory Lane
One of my fondest memories in the kitchen involves a Halloween party I threw a few years ago. I wanted to create something fun that everyone would enjoy, especially the kids. After looking through countless recipes, I stumbled upon the idea of making Oreo balls, but with a twist! I thought, how can we turn these into a spooky treat? The answer? Give them a mummy makeover!
I remember mixing the crushed Oreo cookies with cream cheese and forming little balls while my niece helped by decorating them with the white chocolate “bandages.” We ended up with delicious, sweet creations that not only tasted amazing but looked fantastically spooky! The kids couldn’t get enough, and neither could the adults. The best part? They are so easy to make, and everyone leaves with the happiest, sweetest memories!
Ingredients
Let’s talk about what you need to create these adorable Mummy Oreo Balls. Here’s the final lineup:
-
36 Oreo cookies
- Tip: You can use regular or double-stuffed Oreos depending on how rich you want the flavor to be.
-
8 oz cream cheese, softened
- Tip: Make sure it’s at room temperature for easy mixing. Neufchâtel cheese is a great low-fat substitute too.
-
12 oz white chocolate, chopped or melting wafers
- Tip: For a more seamless melting experience, opt for good-quality white chocolate wafers.
-
Candy eyes
- Tip: Get creative with the eyes—if you can’t find candy eyes, you can use chocolate chips or even mini marshmallows!
-
Optional: Sprinkles or colored sugar
- Tip: Use them to add a sparkling touch to your mummies!
Step-by-Step Instructions
Let’s get cooking! Follow these steps to create your Mummy Oreo Balls:
Step 1: Crush the Oreos
Start by placing the 36 Oreo cookies in a food processor. Pulse them until they are finely crushed. You want that classic Oreo texture!
Chef’s Hack: If you don’t have a food processor, you can throw them into a sturdy zip-top bag and crush them with a rolling pin. Plus, it can be a fun stress reliever!
Step 2: Mix with Cream Cheese
Next, transfer the crushed Oreos to a mixing bowl. Add the softened cream cheese and mix well until combined. You’re looking for a dough-like consistency that holds together.
Tip: Use your hands to mix if you want to feel the texture better. It’s a bit messy, but totally worth it. Just make sure to wash your hands afterward!
Step 3: Form the Balls
Now, grab a tablespoon of the Oreo mixture and roll it into a ball. Place it on a baking sheet lined with parchment paper. Repeat until you’ve shaped all the mixture into balls.
Chef Tip: For uniformity, try using a cookie scoop! It makes the job easier and gives them a beautiful shape.
Step 4: Freeze for Firmness
Pop the baking sheet in the freezer for about 20-30 minutes. This will help the balls firm up, making it easier to coat them in white chocolate.
Step 5: Melt the White Chocolate
While the Oreo balls are chilling, it’s time to melt that white chocolate! You can do this in a microwave or over a double boiler. If using the microwave, heat it in 30-second intervals, stirring in between until fully melted.
Note: Be careful not to overheat the chocolate, or it will seize.
Step 6: Coat the Oreo Balls
Take the Oreo balls out of the freezer. Dip each one into the melted white chocolate, ensuring they are fully coated. Using a fork, gently lift them out and let the excess chocolate drip off.
Tip: If you want a thicker coating, let the first layer set in the fridge for about 10 minutes before coating them again!
Step 7: Decorate with "Mummy Bandages"
Now, melt a little more white chocolate in a piping bag or a zip-top bag with the corner snipped off. Drizzle the melted chocolate over the coated balls in a back-and-forth motion to create the mummy’s "bandages."
Finally, place the candy eyes on each ball before the white chocolate sets!
Step 8: Chill & Serve
Place your decorated Oreo Mummy Balls back into the fridge and let them set completely. Once set, transfer them to a nice platter, and they’re ready to be enjoyed!
Serving Tip: For a fun touch, you can serve them on a spooky-themed plate or put them in cupcake liners for a cute presentation.
Recipe Variations
Now that you’ve got the basics down, let’s have some fun with variations! Here are a few ideas to give your Mummy Oreo Balls a twist:
-
Peanut Butter Oreo Mummies: Use peanut butter Oreos instead of regular ones for a nutty, rich flavor.
-
Chocolate Drizzle: Use milk chocolate or dark chocolate for the drizzle instead of white chocolate for a moody twist.
-
Pumpkin Spice Oreo Version: Use Pumpkin Spice Oreos (if they’re in season) to give a fall twist to your Mummy Balls.
-
Coconut Flake Coating: After dipping in white chocolate, roll them in shredded coconut for a snowy, spooky appearance!
-
Vegan Version: Use vegan cream cheese and dairy-free chocolate options for a tasty plant-based treat!
Chef’s Notes
These Mummy Oreo Balls have been a staple in my fall celebrations for years! The beauty of this recipe is that it’s so forgiving. I’ve often added leftover Halloween candy into the mix for extra sweetness or even swapped out the cream cheese for flavored cheeses just to experiment.
I also remember one Halloween, I accidentally melted my chocolate too much and it seized! Instead of panicking, I decided to use it as a creepy "mud" base, which unexpectedly turned into a fun Halloween treat!
FAQs and Troubleshooting
Q1: What if my chocolate seizes up?
A: Don’t worry if this happens—simply add a teaspoon of vegetable oil to the chocolate, and it should loosen up again.
Q2: How can I make these Mummy Balls ahead of time?
A: You can prepare the Oreo balls and freeze them prior to coating. Just thaw them in the fridge a few hours before you plan to glaze them in chocolate.
Q3: Can I make these gluten-free?
A: Absolutely! Use gluten-free Oreos, and you’re good to go!
Q4: How long will these keep?
A: They can last in the fridge for up to a week—if they last that long!
Nutritional Info (Optional)
Per ball (approximately):
- Calories: 140
- Total Fat: 7g
- Saturated Fat: 4g
- Carbohydrates: 19g
- Sugar: 8g
- Protein: 1g
And there you have it! Mummy Oreo Balls that are not just fun to make but also guaranteed to bring joy to anyone who gets to sink their teeth into them. I hope these little bites of joy warm your kitchen and your heart just as they have done for me. Happy Halloween and happy cooking, my friends! 🎃✨
PrintMummy Oreo Balls
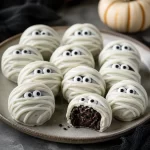
Delightful and spooky Mummy Oreo Balls, perfect for Halloween gatherings. These easy-to-make treats are a fun twist on a classic recipe that everyone will love.
- Prep Time: 15 minutes
- Cook Time: 30 minutes
- Total Time: 45 minutes
- Yield: 24 servings 1x
- Category: Dessert
- Method: Chilling, Melting, Coating
- Cuisine: American
- Diet: Vegetarian
Ingredients
- 36 Oreo cookies
- 8 oz cream cheese, softened
- 12 oz white chocolate, chopped or melting wafers
- Candy eyes
- Optional: Sprinkles or colored sugar
Instructions
- Crush the Oreo cookies in a food processor until finely crushed.
- Mix the crushed Oreos with softened cream cheese until combined.
- Form the mixture into balls and place them on a baking sheet lined with parchment paper.
- Freeze the baking sheet for about 20-30 minutes to firm up the balls.
- Melt the white chocolate in a microwave or double boiler until smooth.
- Coat the Oreo balls in the melted white chocolate and let the excess drip off.
- Decorate with melted white chocolate to create mummy bandages and add candy eyes.
- Chill the decorated balls until the chocolate sets, then serve.
Notes
These Mummy Oreo Balls can be varied by using peanut butter Oreos or adding different toppings like shredded coconut for a spooky effect.
Nutrition
- Serving Size: 1 ball
- Calories: 140
- Sugar: 8g
- Sodium: 100mg
- Fat: 7g
- Saturated Fat: 4g
- Unsaturated Fat: 3g
- Trans Fat: 0g
- Carbohydrates: 19g
- Fiber: 1g
- Protein: 1g
- Cholesterol: 30mg
Keywords: Halloween, dessert, Oreo balls, Mummy treats, candy, festive recipes