How To Can Peaches: A Sweet Summer Preserve
Hello, peach lovers! It’s Nina here, and today we’re diving into the wonderful world of canning peaches. Whether you want to savor the taste of summer all year long or give a delightful homemade gift, this step-by-step guide will help you preserve those juicy, sun-kissed peaches right from your farmer’s market or backyard garden. There’s something incredibly satisfying about cracking open a jar of peachy goodness in the middle of winter, isn’t there?
A Trip Down Memory Lane
Let me take you back to hot summer afternoons spent at my grandmother’s house. The air was sweet with the smell of sun-ripened peaches, and every year, she would invite the family over for canning day. It was a mix of chaos and laughter, with the kids running around while the adults gathered in the kitchen, sharing stories and memories as we peeled, pitted, and packed those peaches into jars.
I remember Uncle Joe always sneaking a slice while we worked, claiming he was “tasting for quality control.” Grandma would roll her eyes with a smile as we all took our turns at the canning station, creating our little assembly line. By the end of the day, we had shelves lined with glistening jars that would hold summer’s sweetness well into the cold months. Celebrating together, it wasn’t just about the peaches; it was about the love, laughter, and stories that intertwined with every jar.
Now, I carry on that legacy, and I can’t wait to share this cherished craft with all of you. So, gather your ingredients, and let’s get those peaches ready for the jars!
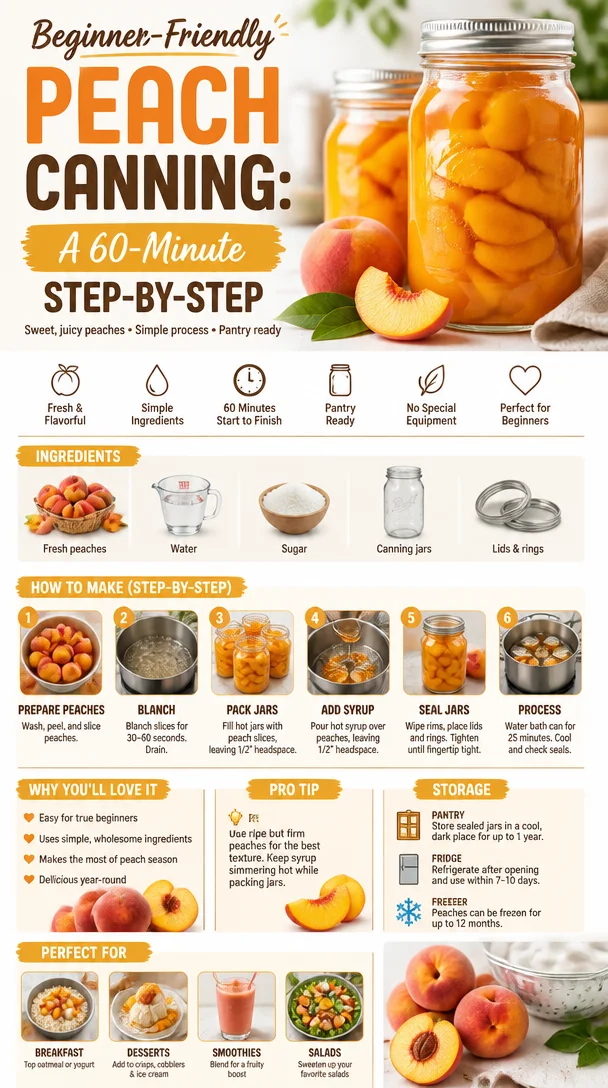
Ingredients
Here’s what you’ll need to can your own peaches:
-
Fresh Peaches: Choose firm, ripe peaches. Look for unblemished fruits that have a lovely aroma. Tip: If you can’t find fresh peaches, frozen peaches work too! Just thaw them before canning.
-
Water: This will be for the syrup and processing. Use filtered water for the best flavor.
-
Sugar: Granulated sugar helps create a sweet syrup and enhances the natural flavor of the peaches. Chef’s insight: Adjust the sugar content based on your taste. Honey or agave syrup can also be great substitutes.
-
Canning Jars: Make sure they’re either new or properly sterilized if they’ve been used before. Pint or quart jars both work, depending on how much peachy goodness you want to store!
-
Lid and Ring: A proper sealing lid is essential for safe canning. Always check for nicks or dents before using.
Step-by-Step Instructions
Ready to get cooking? Let’s do this!
Step 1: Prepare Your Jars
Start by sterilizing your jars and lids. You can do this by placing them in a pot of boiling water for 10 minutes. This helps ensure your preserves remain safe to eat. If you’re using a dishwasher, running them through a hot cycle works, too. Just keep them warm until you’re ready to fill them.
Tip: You can keep the jars in the oven at a low temperature (around 200°F) while you prepare the peaches!
Step 2: Peel and Pit the Peaches
Fill a large pot with water and bring it to a boil. Add the peaches for about 30 seconds and then quickly transfer them to an ice bath. This is the easiest way to peel them! The skins should slip right off.
Chef hack: Use a serrated knife if you struggle with the skins—they’ll glide right through the soft peach flesh.
Once peeled, cut the peaches in half and remove the pits.
Step 3: Make the Syrup
In a saucepan, combine 4 cups of water with 1 cup of sugar over medium heat. Stir it until the sugar dissolves fully. You’ll want a light syrup; feel free to adjust the sugar to your liking. Bring it to a gentle simmer and remove from heat.
Tip: For an extra flavor kick, consider adding a few sprigs of mint or a dash of cinnamon to the syrup!
Step 4: Pack the Peaches
Now it’s time to pack those beautiful peach halves into your jars! Place them cut-side down, packing them snug but not overly tight. Pour the syrup over the peaches, leaving about ½ inch of headspace at the top of the jar. This space is essential for proper sealing during the canning process.
Tip: Use a butter knife to gently poke around the edges to release any trapped air bubbles!
Step 5: Seal the Jars
Wipe the rim of each jar with a clean cloth to remove any syrup residue, which could interfere with sealing. Place the lid on and then screw the ring down until it’s fingertip-tight.
Chef’s Story: I’ve learned the hard way that over-torquing can cause jars to not seal properly!
Step 6: Process the Jars
Fill your canning pot with water, ensuring that the jars are fully submerged. Cover and bring to a boil. Process your jars in boiling water for about 20 minutes. Make sure to check the water level; add more if necessary.
Tip: Altitude plays a role in processing time. If you live at a higher elevation, you might need to adjust the time by about 5 minutes.
Step 7: Cool Down
Once the processing time is up, carefully remove the jars with jar tongs and place them on a clean kitchen towel to cool. You’ll want to hear that delightful “ping” as the jars seal!
Serving Suggestions
Once your jars are cool, feel free to store them in the pantry or give them as gifts. When you’re ready to enjoy those peaches:
- As a topping: Serve them over vanilla yogurt or ice cream.
- In salads: Toss them into a summer salad for a sweet twist.
- In baked goods: Add them to cobblers, pies, or muffins for a delightful treat.
Recipe Variations
Want to switch things up a bit? Here are some creative twists and variations on this peach-canning adventure:
-
Spiced Peaches: Add whole cloves or allspice to your syrup for a warm, aromatic flavor.
-
Peach Chutney: Dice the peaches instead of halving them and mix with vinegar, onion, and spices for a savory condiment.
-
Peach Lavender Jam: Blend fresh lavender with your syrup for a fragrant touch.
-
Low-Sugar Option: Substitute sugar with a natural sweetener like stevia to reduce sugar content.
-
Mixed Fruit Jars: Combine peaches with other fruits such as pears or berries for a delightful mix!
Chef’s Notes
Canning peaches has truly been a heartwarming part of my kitchen journey. Each jar holds not just fruit but the spirit of family, love, and the joy of cooking together. While the method might seem intimidating at first, your first batch will pave the way for many more delicious preserving adventures.
And hey, don’t get disheartened if a jar doesn’t seal perfectly—just pop it in the fridge and enjoy it right away! The memories we create in the kitchen are as important as the food we make.
FAQs and Troubleshooting
Q: Why didn’t my jar seal?
A: If the jar doesn’t seal after cooling, it could be due to food residue on the rim or insufficient processing time. Just refrigerate it and enjoy within one week.
Q: Can I use frozen peaches?
A: Absolutely! Just remember to thaw them thoroughly beforehand; they tend to have a softer texture after canning, but they’re delicious nonetheless.
Q: How long do canned peaches last?
A: Properly sealed jars can last up to a year in a cool, dark place. Once opened, consume within a week to enjoy their best flavor!
Q: What if my peaches turn brown during the canning process?
A: Browning can be a result of oxidation. To prevent this, you can soak the prepared peaches in a solution of water and lemon juice prior to canning.
Nutritional Info (Optional)
If you’re counting your nutrition, canned peaches in syrup typically contribute:
- Calories: Approximately 70-90 per half cup
- Carbohydrates: 18-22g
- Fiber: 1g
- Sugars: 12-16g
- Vitamin C: 6% of daily value
Whether you’re canning to preserve flavors or simply to enjoy your summer bounty, each jar of peaches you create holds a story, a memory, and a future family tradition. So, get ready to fill your kitchen with those heavenly peach scents, and remember—it’s not just about the food; it’s about sharing those moments with the people you love.
Let’s get cooking! 🍑✨
PrintHow To Can Peaches: A Sweet Summer Preserve

A step-by-step guide on how to can peaches, preserving their delicious summer flavor for winter.
- Prep Time: 20 minutes
- Cook Time: 30 minutes
- Total Time: 50 minutes
- Yield: 4-6 servings
- Category: Preserves
- Method: Canning
- Cuisine: American
- Diet: Vegetarian
Ingredients
- Fresh Peaches
- Water
- Granulated Sugar
- Canning Jars
- Lid and Ring
Instructions
- Prepare your jars by sterilizing them in boiling water for 10 minutes or running them through a hot dishwasher cycle.
- Peel and pit the peaches by blanching them in boiling water for 30 seconds, then transferring them to an ice bath.
- Make the syrup by combining 4 cups of water with 1 cup of sugar over medium heat until dissolved.
- Pack the peach halves snugly into the jars, cut-side down, and pour the syrup over them, leaving ½ inch headspace.
- Seal the jars by wiping the rims clean and placing the lids on, screwing the rings until fingertip-tight.
- Process the jars in boiling water for 20 minutes, ensuring they are fully submerged.
- Cool down the jars on a clean kitchen towel and listen for the sound of sealing.
Notes
Adjust the sugar content based on your taste. Frozen peaches can be used if fresh ones are unavailable. Keep jars in a low oven to keep warm while preparing peaches.
Nutrition
- Serving Size: 1 half cup
- Calories: 80
- Sugar: 14g
- Sodium: 0mg
- Fat: 0g
- Saturated Fat: 0g
- Unsaturated Fat: 0g
- Trans Fat: 0g
- Carbohydrates: 20g
- Fiber: 1g
- Protein: 1g
- Cholesterol: 0mg
Keywords: canning peaches, summer preserves, homemade gifts, peach recipes, preserving fruit