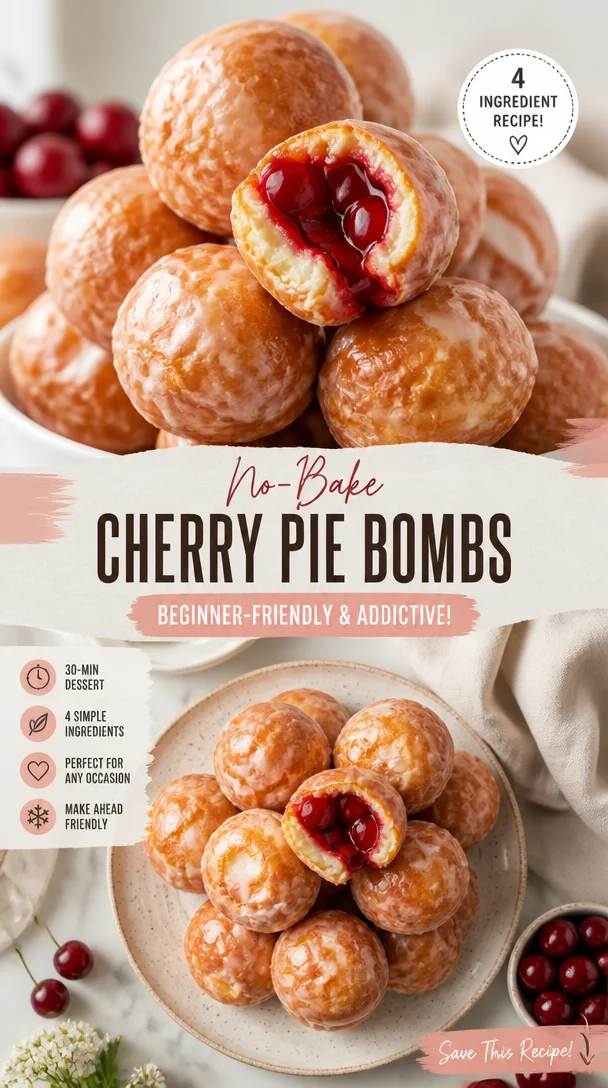
Cherry Pie Bombs: A Sweet Bite of Nostalgia
Oh, cherry pie! It’s one of those classic desserts that instantly brings back memories of grandma’s cozy kitchen during summer gatherings. Who can resist the delightful aroma of baked cherries mingling with buttery crust wafting through the air? Today, I’m excited to share a fun twist on this timeless treat: Cherry Pie Bombs! Perfectly portable and utterly delicious, these little bites of joy are sure to be a hit whether it’s a family gathering or a chill movie night. Let’s dive in!
A Slice of Memory
Let me take you back to my childhood. Picture this: the sun streaming through the kitchen window, the sweet scent of cherry filling the air, and my grandma humming her favorite tune as she rolled out her pie dough. Saturday afternoons were often spent waiting impatiently for her to finish preparing her famous cherry pie. But, here’s the fun part—I usually couldn’t resist and would sneak spoonfuls of the warm cherry filling right out of the bowl!
Fast forward years later, and I still hold a fondness for that filling. That nostalgia inspired me to create these Cherry Pie Bombs. They encapsulate the love of homemade cherry pie, with a fun, bite-sized twist perfect for sharing (or eating all by yourself!).
Gather Your Ingredients
Before we roll up our sleeves and get cooking, let’s gather what we need. Here’s your shopping list:
-
1 package of refrigerated pie crusts: These are the backbone of our Cherry Pie Bombs. They save time and still deliver that flaky goodness! If you’re feeling adventurous, you can make your own from scratch, but I promise you won’t regret the convenience of store-bought.
-
1 can of cherry pie filling: This is where the magic happens. Look for filling that’s all-natural if possible, as it really lets the cherry flavor shine. You can substitute with blueberry or raspberry filling if you’re in the mood for something different!
-
Oil for frying: We’ll need enough to fill a deep skillet or pot for frying your bombs. Canola or vegetable oil works great here. If you prefer to bake, you can brush the bombs with melted butter and bake them at 375°F (190°C) for 15-20 minutes.
-
1 cup powdered sugar: This is for making the heavenly glaze. It adds a sweet finish that complements the tart cherries perfectly. You can swap for coconut sugar if you want a less sweet option.
-
2 tablespoons milk: Just enough to thin out the glaze. You can replace this with almond milk or any milk alternative if you’re dairy-free.
-
1 teaspoon vanilla extract: A splash of vanilla elevates the flavor—trust me on this one! You can also use almond extract for a different aromatic twist.
Step-by-Step Instructions
Alright, foodies! Let’s get down to the glorious art of making Cherry Pie Bombs.
1. Prep the Pie Crusts
Roll out your refrigerated pie crusts on a floured surface. (Pro Tip: Let them sit out for about 10 minutes before rolling to make them more pliable.) Use a round cookie cutter or a glass to cut out circles, about 4 inches in diameter. You should aim for about 10 circles, but feel free to make as many as you can!
2. Fill ‘Em Up
Spoon a generous tablespoon of cherry pie filling into the center of each circle. Make sure not to overfill—about two-thirds full is ideal to prevent overflow during cooking (trust me, you don’t want a messy kitchen!).
3. Seal the Bombs
Moisten the edges of each circle with your fingers or a little water. Fold the dough over to create a half-moon shape, press to seal, then use a fork to crimp the edges. This adds a cute touch and makes sure no filling escapes!
4. Heat the Oil
In a deep skillet, heat about 2-3 cups of oil (enough for frying) over medium-high heat. To check if it’s hot enough, drop a small piece of dough into the oil; if it sizzles, you’re good to go!
5. Fry the Bombs
Carefully place a few bombs in the hot oil, being sure not to overcrowd the skillet. Fry them for about 3-4 minutes per side or until golden brown. Use a slotted spoon to flip them halfway through. (Kitchen Hack: If you find they get too dark before they’re fully cooked, lower the heat!)
6. Drain and Cool
Once they’re golden and puffed, remove them from the oil and set them on a plate lined with paper towels. This will help soak up the excess oil—a perfect moment to admire your beautiful creations!
7. Whip Up the Glaze
In a small bowl, mix the powdered sugar, milk, and vanilla extract until smooth. Adjust consistency with more milk if it’s too thick or more sugar if it’s too runny.
8. Drizzle and Serve
Once the bombs are cool enough to handle, drizzle the glaze over the tops. Serve warm, and watch your friends’ faces light up with joy!
Serving Suggestions
Cherry Pie Bombs are best served fresh, just slightly warm to maintain that gooey filling. You can present them on a stunning cake stand or a rustic platter to amplify that cozy home feel. For a fun twist, sprinkle some extra powdered sugar on top or add a scoop of vanilla ice cream on the side for dipping!
Recipe Variations
Want to get creative? Check out these delightful variations you can try:
-
Mixed Berry Bombs: Swap the cherry filling for a combination of mixed berries! Strawberries, blueberries, and raspberries paired together make a vibrant and tangy treat.
-
Chocolate Cherry Bombs: Add a tablespoon of chocolate chips to the cherry filling for a decadent treat that chocolate lovers won’t be able to resist!
-
Spiced Apple Bombs: Use spiced apple pie filling instead of cherry, and add a sprinkle of cinnamon to the glaze for a warm fall flavor.
-
Savory Option: For something different, try using cheese and spinach or shredded chicken with barbecue sauce inside the crust for a savory twist.
-
Vegan Delight: Replace the pie crust with a vegan option and use almond milk for the glaze for a plant-based treat everyone can enjoy!
Chef’s Notes
These Cherry Pie Bombs are so versatile. When I first made them, I didn’t play around much with flavors at all. But after experimenting, I found that even the simplest recipe can take on so many forms. Also, they’re a fantastic way to reduce waste in your kitchen—leftover pie crusts can be transformed into something extraordinary!
Oh—and don’t be surprised if you find yourself sneaking tastes of the cherry filling before you even fry the bombs. I won’t tell anyone!
FAQs and Troubleshooting
Can I bake these instead of frying?
Absolutely! If you want to skip frying, simply brush them with melted butter and bake at 375°F (190°C) for about 15-20 minutes until golden brown.
What if my bombs burst open while frying?
If this happens, you might have overfilled them. Next time, stick to about 1 tablespoon of filling and make sure they’re sealed well.
How do I store leftovers?
Keep any leftovers in an airtight container in the fridge for up to 2 days. Reheat them in the oven for a few minutes to regain that lovely crispiness.
Can I freeze the filled bombs?
Yes! These can be frozen before frying. Just ensure they’re well-sealed and stored in a freezer-safe container. When you’re ready to enjoy, no need to thaw—just fry them right out of the freezer!
Nutritional Info
Here’s a quick breakdown of the nutritional content per serving (one bomb), assuming about 10 bombs:
- Calories: Approximately 130
- Protein: 1g
- Carbohydrates: 18g
- Dietary Fiber: 1g
- Sugars: 5g
- Fat: 6g
Feel free to adjust based on specific ingredients you use and enjoy responsibly!
Wrapping Up
There you have it—my whimsical take on Cherry Pie Bombs that combine sweetness with a generous helping of nostalgia. These little bites are not only tasty but also a reminder of the love that goes into cooking and the happiness that comes from sharing. So gather your ingredients, summon your inner chef, and get ready to create something truly special in your kitchen.
If you loved this recipe as much as I loved sharing it, don’t forget to leave a comment to let me know how your Cherry Pie Bombs turned out! Happy cooking, friends! 🍒✨
PrintCherry Pie Bombs

Portable, bite-sized treats bursting with sweet cherry flavor, reminiscent of Grandma’s classic cherry pie.
- Prep Time: 15 minutes
- Cook Time: 20 minutes
- Total Time: 35 minutes
- Yield: 10 servings 1x
- Category: Dessert
- Method: Frying
- Cuisine: American
- Diet: Vegetarian
Ingredients
- 1 package refrigerated pie crusts
- 1 can cherry pie filling
- Oil for frying
- 1 cup powdered sugar
- 2 tablespoons milk
- 1 teaspoon vanilla extract
Instructions
- Prep the pie crusts by rolling them out on a floured surface and cutting circles about 4 inches in diameter.
- Fill each circle with a generous tablespoon of cherry pie filling.
- Seal the bombs by moistening edges, folding, and crimping them.
- Heat about 2-3 cups of oil in a deep skillet over medium-high heat.
- Fry the bombs for 3-4 minutes on each side until golden brown.
- Drain and cool on paper towels.
- Whip up the glaze by mixing powdered sugar, milk, and vanilla extract until smooth.
- Drizzle the glaze over the cooled bombs and serve warm.
Notes
For a healthier version, try baking at 375°F (190°C) for 15-20 minutes instead of frying.
Nutrition
- Serving Size: 1 bomb
- Calories: 130
- Sugar: 5g
- Sodium: 100mg
- Fat: 6g
- Saturated Fat: 0.5g
- Unsaturated Fat: 4g
- Trans Fat: 0g
- Carbohydrates: 18g
- Fiber: 1g
- Protein: 1g
- Cholesterol: 0mg
Keywords: cherry pie bombs, dessert, fried treats, cherry filling, nostalgic recipes