Decadent Chocolate Cake Roll: A Slice of Nostalgia
Hey there, food lovers! 🍫✨ It’s Nina from RusticFlavor, and today we’re diving into a delightful recipe that’ll whisk you back to childhood—the Chocolate Cake Roll. This enchanting dessert is perfect for impressing guests or simply enjoying during a cozy night in. Its lush chocolatey goodness, combined with a creamy filling, makes this treat unforgettable. So, roll up your sleeves, and let’s create some magic in the kitchen!
A Walk Down Memory Lane
Growing up, my kitchen always brimmed with warmth and that unmistakable aroma of something sweet baking in the oven. One of the most cherished memories I have is watching my grandmother whip together her famous chocolate cake roll. The artistry involved in rolling the sponge cake, the joy bubbling in the air as we gathered around, and the satisfaction of licking the bowl clean were simply irreplaceable.
Every holiday, I’d gleefully help her in the kitchen, mixing ingredients, and stealing bites of that irresistible ganache. No matter how hectic the world got, that beautiful cake brought us together and ensured our smiles never faded. Now, I’m passing down this tradition with my easy, rustic take on the classic chocolate cake roll. Let’s create sweet memories just like those!
Gather Your Ingredients
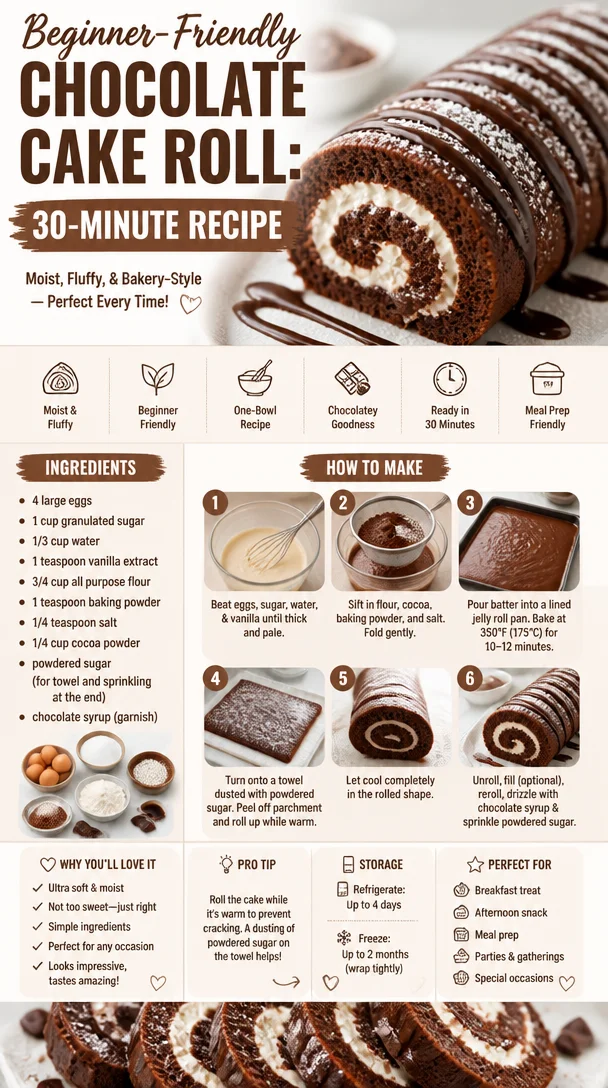
To whip up this decadent Chocolate Cake Roll, here’s what you’ll need:
-
4 large eggs
Fresh eggs are vital for that light, airy texture. If you’re out, you can substitute with egg replacers according to package directions. -
1 cup granulated sugar
Sweeten the deal! If you prefer a bit of a healthier option, raw sugar or coconut sugar works nicely, too. -
1/3 cup water
This gives the batter the right consistency—it’s what keeps everything moist. Consider substituting with brewed coffee for deeper flavor! -
1 teaspoon vanilla extract
A must-have for any dessert. You can also try almond extract for a unique twist. -
3/4 cup all-purpose flour
This is the backbone of your cake roll. For gluten-free options, a 1:1 gluten-free baking flour blend can work wonders. -
1 teaspoon baking powder
This little ingredient ensures our cake rolls up perfectly. Be sure it hasn’t expired for the best results! -
1/4 teaspoon salt
A pinch of salt enhances the sweetness, making every bite shout “delicious!” -
1/4 cup unsweetened cocoa powder
This gives our cake that rich, chocolatey depth. For a sweeter option, opt for Dutch-processed cocoa. -
Powdered sugar (for towel and sprinkling at the end)
Essential for dusting and preventing sticking when rolling. -
Chocolate syrup (for garnish)
Because who doesn’t love a little extra chocolate?
Step-by-Step Instructions
Let’s get started! Follow these steps for a cake roll that’s sure to impress.
-
Preheat Your Oven
Preheat your oven to 375°F (190°C). This step is crucial for ensuring an even bake! -
Prepare the Baking Sheet
Line a 15×10-inch jelly roll pan with parchment paper. Lightly grease the paper for easy removal. A little chef tip: Sprinkle a dusting of cocoa powder on the greased paper to make sure your cake doesn’t stick! -
Mix the Wet Ingredients
In a large mixing bowl, beat the eggs and granulated sugar together until the mixture is pale and fluffy—about 5-7 minutes. It should form a thick ribbon when you lift the beaters. A stand mixer or handheld mixer works great here. -
Add Water and Vanilla
Gradually stir in the water and vanilla extract. This adds moisture and enhances the flavor. Don’t rush; give it a gentle fold! -
Combine the Dry Ingredients
In a separate bowl, whisk together the flour, baking powder, cocoa powder, and salt. This will ensure even distribution. Slowly add the dry mixture to the wet ingredients, folding gently until just combined. Be careful not to overmix; we want to keep all that lovely airiness! -
Pour and Bake
Spread the batter evenly into the prepared pan. Bake for about 12-15 minutes or until the cake springs back when lightly pressed. Keep an eye on it—the baking time can be quick! -
Roll It Up
As soon as the cake is out of the oven, sprinkle a generous layer of powdered sugar over a clean kitchen towel. Carefully turn the cake onto the towel and peel away the parchment paper. Starting at one end, roll the cake up with the towel. Let it cool completely this way to help maintain its shape. -
Prepare the Filling
While it’s cooling, whip up your filling. You can use whipped cream, cream cheese frosting, or my favorite—ganache! Just melt chocolate with a bit of heavy cream, let it cool slightly, and whip until fluffy. -
Unroll, Fill, and Roll Again
Once cool, gently unroll the cake. Spread the filling evenly over the surface, leaving a small border on the edges. Roll it back up (without the towel this time!), securing it tightly. -
Chill and Decorate
Wrap the roll in plastic wrap and chill for at least an hour. When ready to serve, drizzle with chocolate syrup and dust with more powdered sugar.
Serving Suggestions
Present your Chocolate Cake Roll on a beautiful platter for that “wow” factor. Slice it into even pieces; each slice should reveal a stunning spiral of cake and filling. Perhaps plate it with some fresh berries on the side for a pop of color and a touch of tartness to balance the rich chocolate.
Recipe Variations
Let’s make this cake roll even more exciting! Here are a few flavorful twists you can try:
-
Spicy Chocolate Roll: Add a pinch of cayenne pepper or espresso powder to the batter for a warming kick.
-
Nutty Delight: Fold in crushed nuts, like walnuts or hazelnuts, into the filling for added texture and flavor.
-
Fruit-Filled Version: Swap out the filling for a fruit puree, like raspberry or strawberry, for a fresh, fruity twist.
-
Minty Fresh: Add a few drops of peppermint extract to your filling for a refreshing mint chocolate experience.
-
Vegan Chocolate Roll: Use aquafaba instead of eggs and a plant-based cream for the filling!
Chef’s Notes
This recipe has been a part of my family tradition for as long as I can remember. With every roll, I find myself reminiscing about laughter-filled kitchen moments with my grandmother as she taught me the art of baking—especially the secret to a flawless roll.
Remember, practice makes perfect! The more you make this delightful dessert, the better you’ll become at rolling it up tightly without cracking. Don’t fret if things don’t go perfectly the first time—every kitchen has its quirks, and that’s the beauty of cooking!
FAQs and Troubleshooting
1. Why did my cake crack?
Cracking often happens if the cake is overbaked or rolled too tightly when warm. Ensure to roll it gently and not leave it in the oven too long!
2. How can I store my Chocolate Cake Roll?
You can keep it tightly wrapped in plastic in the fridge for up to three days. If you want to keep it longer, freeze it! Tightly wrap it and enjoy within two months.
3. Can I make this in advance?
Absolutely! This cake roll can be made a day ahead. Just store it in the fridge, and it will be even tastier the next day.
4. How do I get the filling to stay in without oozing out?
Ensure the filling isn’t too runny. Chilling it before spreading can help it firm up. And make sure you roll it up while the cake is still slightly warm to help it hold its shape!
Nutritional Info (if applicable)
(optional depending on your requirements)
This Chocolate Cake Roll is certainly a treat, and moderation is key! While I won’t provide specifics here, you can adjust portion sizes and ingredients according to your dietary preferences.
So there you have it! Your very own Chocolate Cake Roll recipe that combines nostalgia with a touch of culinary fun. I hope you enjoy making—and sharing—this delightful dessert as much as I do. Happy baking, and remember, friends: in the world of cooking, it’s all about bringing people together one delicious bite at a time! 🍫💖
Now go roll that cake!
PrintDecadent Chocolate Cake Roll
A delightful chocolate cake roll filled with creamy goodness, perfect for impressing guests or enjoying cozy nights.
- Prep Time: 20 minutes
- Cook Time: 15 minutes
- Total Time: 35 minutes
- Yield: 8 servings 1x
- Category: Dessert
- Method: Baking
- Cuisine: American
- Diet: Vegetarian
Ingredients
- 4 large eggs
- 1 cup granulated sugar
- 1/3 cup water
- 1 teaspoon vanilla extract
- 3/4 cup all-purpose flour
- 1 teaspoon baking powder
- 1/4 teaspoon salt
- 1/4 cup unsweetened cocoa powder
- Powdered sugar (for towel and sprinkling at the end)
- Chocolate syrup (for garnish)
Instructions
- Preheat your oven to 375°F (190°C).
- Prepare a 15×10-inch jelly roll pan with parchment paper and lightly grease it.
- Mix the eggs and granulated sugar together until pale and fluffy—about 5-7 minutes.
- Add water and vanilla extract, gently folding in.
- Combine the flour, baking powder, cocoa powder, and salt in a separate bowl.
- Pour the dry mixture into the wet ingredients, folding gently until just combined.
- Spread the batter evenly into the prepared pan and bake for 12-15 minutes.
- Roll the cake in a powdered sugar-dusted towel as soon as it comes out of the oven.
- Prepare your preferred filling, such as whipped cream or ganache.
- Unroll the cooled cake, fill it, and roll it back up without the towel.
- Chill wrapped in plastic for at least an hour before decorating with chocolate syrup and powdered sugar.
Notes
Practice makes perfect! If the cake cracks, it may be overbaked or rolled too tightly. Enjoy within three days when stored in the fridge.
Nutrition
- Serving Size: 1 serving
- Calories: 300
- Sugar: 20g
- Sodium: 200mg
- Fat: 10g
- Saturated Fat: 3g
- Unsaturated Fat: 5g
- Trans Fat: 0g
- Carbohydrates: 40g
- Fiber: 2g
- Protein: 6g
- Cholesterol: 70mg
Keywords: chocolate cake roll, dessert, baking, nostalgic dessert, cake recipes