Halloween Dirt Cups: A Spooktacularly Fun Dessert!
Who doesn’t love a fun and delicious treat that can bring the family together? Especially when it comes to Halloween! Today, I’m thrilled to share with you a playful dessert that’s as yummy as it is charming: Halloween Dirt Cups! 🍬👻
Imagine this: It’s a crisp autumn evening, and the air is filled with laughter. You’re surrounded by friends and family, sipping on your favorite warm beverage while the faint sound of leaves crunching outside fills the air. You say "BOO" to a few mischievous ghosts lurking around your living room, and from somewhere in the kitchen, the sweet smell of chocolate wafts through the air. That, my friends, is the magic of Halloween dirt cups!
Personal Story
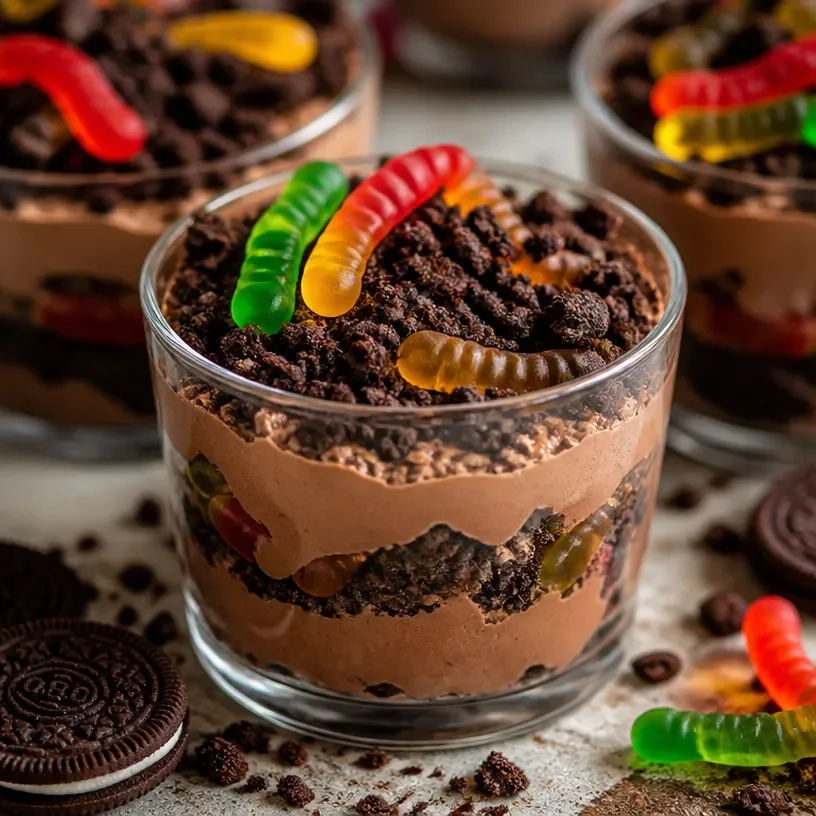
One of my fondest memories from my childhood is when I helped my mom prepare for Halloween. Our kitchen would turn into a creative playground filled with ingredients, and we often ended up with more chocolate on our faces than in our bowls! One year, we decided to whip up these delightful dirt cups for our Halloween gathering. As we layered chocolate pudding and those perfectly crumbled chocolate sandwich cookies, I found myself giggling at the sight of the gummy worms making their way through the "dirt."
Seeing my little cousins’ eyes light up when they first laid eyes on these spooky treats made my heart flutter. It was pure joy wrapped in a cup! Even now, I can just picture our family sitting down together, sharing stories as we dug into our delicious creations. It reminds me that cooking is not just about the food; it’s about making memories and spreading happiness, too!
Ingredients
To whip up these spooktacular Halloween Dirt Cups, you’ll need the following ingredients:
-
1 package chocolate pudding mix
This forms the creamy base of your dirt cups. If you’re short on time or ingredients, instant pudding is a great alternative! -
2 cups milk
You’ll mix this with the pudding to create that rich, silky texture. You can use any type of milk – skim, whole, or even dairy-free options like almond or oat milk work wonders! -
12 crushed chocolate sandwich cookies
These give the dirt cups their fun “dirt” appearance. If you’re feeling adventurous, you could swap them for crushed graham crackers for a different flavor! -
Gummy worms
The pièce de résistance! These wiggly candies are what make the cups come alive. If you want a healthier twist, try using gummy fruit snacks or even sour worms!
Step-by-Step Instructions
Ready to dive in? Let’s get cooking!
-
Prepare the Pudding
In a medium-sized bowl, whisk together the chocolate pudding mix and the milk.- Chef Tip: Don’t skimp on whisking! Make sure all the mix is dissolved to achieve a smooth and creamy consistency. Use a hand mixer for an extra fluffy texture!
-
Chill the Pudding
Cover the bowl with plastic wrap and refrigerate for about 5-10 minutes.- Chef Insight: This allows the pudding to set properly, but if you’re in a hurry, you can skip this step. Just remember to keep whisking to avoid any lumps!
-
Crush the Cookies
Place the chocolate sandwich cookies in a large ziplock bag and crush them with a rolling pin until you have fine crumbs.- Little Chef Hack: If you want some bigger chunks for texture, leave a few pieces larger. They’ll add an extra bite to your dirt cups!
-
Layer the Cups
Grab some clear plastic cups or small bowls for a beautiful presentation (the layers make it much more fun!). Start by spooning a layer of the chocolate pudding into each cup.- Tip: Aim for about a third of the way full; you don’t want to give away all the pudding right away!
-
Add the Dirt
Next, sprinkle a generous layer of crushed chocolate sandwich cookies on top of the pudding.- Chef’s Note: For added fun, you can sprinkle in some mini chocolate chips or even a layer of whipped cream before adding the dirt!
-
Repeat the Layers
Repeat the process with another layer of pudding followed by more cookie crumbs until you reach the top of the cup.- Fun Tip: Feel free to pile it high! Just make sure to leave some space for the wiggly friends.
-
Top With Gummy Worms
Finally, stick a few gummy worms on top of each cup, letting them dangle over the sides for that authentic “buried in the dirt” look.- Serving Suggestion: You can also place some gummy insects or creepy-crawly candies for added effect!
-
Serve and Enjoy
Pop them in the fridge for a little while longer to chill (about 30 minutes is ideal) and serve them to your eager family members and friends.- Little Chef Hack: For a Halloween party, make a big batch, place them on a spooky-themed table, and watch them disappear in minutes!
Recipe Variations
Now, why stop at the classic recipe when you can have fun with different flavors and textures? Here are a few creative twists to consider:
-
Pumpkin Spice Dirt Cups: Swap the chocolate pudding for pumpkin pudding and mix in some pumpkin pie spice for a warm, fall flavor!
-
Chocolate Mint Delight: Use mint-flavored pudding and top with crushed mint chocolate candies instead of cookies. Your friends will love the refreshing twist!
-
Nutty Chocolate Delight: Mix crushed nuts like almonds or pecans into your cookie layer for a crunchy surprise.
-
Fruit & Dirt Cups: Replace some of the pudding with layers of whipped cream and add fruity toppings like strawberries or blueberries for a healthier twist.
-
Gluten-Free Option: Use gluten-free chocolate cookies, and you’re good to go! There are plenty of tasty options available that fit the bill.
Chef’s Notes
Every recipe I create has a story and a little twist of its own, and Halloween Dirt Cups are no exception! Over the years, I’ve played around with various ingredients and find that each variation brings out a different kind of joy. I remember when I first tried the pumpkin spice addition during a cozy Halloween gathering—it was an instant hit!
Some of the best kitchen memories come not just from the food itself, but from sharing the experience with friends and loved ones. I’ve found that making these dirt cups is a wonderful way to bond with family members. So, whether you’re making them alone or inviting the kiddos to help, you’re bound to create delightful moments.
FAQs and Troubleshooting
Here are a few common questions and issues that might pop up during your dirt cup adventures!
-
Q: My pudding didn’t set properly. What happened?
A: This can happen if the mixture didn’t have enough time to chill or if the milk wasn’t fully integrated with the pudding mix. Ensure you whisk thoroughly and give it time to chill so it sets up nicely! -
Q: Can I make these cups ahead of time?
A: Absolutely! You can prepare them a day in advance and keep them refrigerated until you’re ready to serve. They often taste even better the next day, allowing the flavors to meld! -
Q: What if I can’t find chocolate sandwich cookies?
A: No worries! You can use graham crackers, Oreos, or even crushed chocolate-covered pretzels for a different yet delicious take! -
Q: How long can I store leftovers?
Stored in an airtight container in the fridge, these cups will stay fresh for about 2-3 days. Just be aware that the cookies may lose their crunch!
Nutritional Info
While Halloween is the time for treats, it’s always good to be mindful of our choices. Here’s a rough nutritional breakdown for one serving of these delightful dirt cups:
- Calories: Approximately 350
- Fat: 12g
- Carbohydrates: 58g
- Protein: 4g
Remember, treats are meant to be enjoyed, so indulge in the experience rather than counting every calorie!
There you have it! Halloween Dirt Cups that are not only delicious but also a wonderful way to gather friends and family together! Now that you have all the tools and tips, roll up your sleeves, gather your ingredients, and let’s make some magical memories this Halloween season. Happy cooking, my fellow foodies! 🎃✨
PrintHalloween Dirt Cups

A playful and delicious dessert that combines chocolate pudding, crushed cookies, and gummy worms for a spooky Halloween treat.
- Prep Time: 10 minutes
- Cook Time: 0 minutes
- Total Time: 40 minutes
- Yield: 4 servings 1x
- Category: Dessert
- Method: No Bake
- Cuisine: American
- Diet: Vegetarian
Ingredients
- 1 package chocolate pudding mix
- 2 cups milk
- 12 crushed chocolate sandwich cookies
- Gummy worms
Instructions
- Prepare the pudding by whisking together the chocolate pudding mix and the milk in a medium-sized bowl.
- Chill the pudding by covering the bowl with plastic wrap and refrigerating for 5-10 minutes.
- Crush the cookies in a ziplock bag using a rolling pin until fine crumbs.
- Layer the cups by spooning a layer of pudding into clear plastic cups or small bowls.
- Add a layer of crushed cookies on top of the pudding.
- Repeat the process with another layer of pudding followed by more cookie crumbs.
- Top each cup with gummy worms, letting them dangle over the sides.
- Serve them chilled after resting in the fridge for about 30 minutes.
Notes
Can be made a day in advance and stored in the fridge. For a twist, try using pumpkin pudding or mint-flavored pudding.
Nutrition
- Serving Size: 1 serving
- Calories: 350
- Sugar: 23g
- Sodium: 300mg
- Fat: 12g
- Saturated Fat: 4g
- Unsaturated Fat: 6g
- Trans Fat: 0g
- Carbohydrates: 45g
- Fiber: 2g
- Protein: 6g
- Cholesterol: 0mg
Keywords: Halloween dessert, chocolate pudding, fun dessert, kids dessert, spooky treats