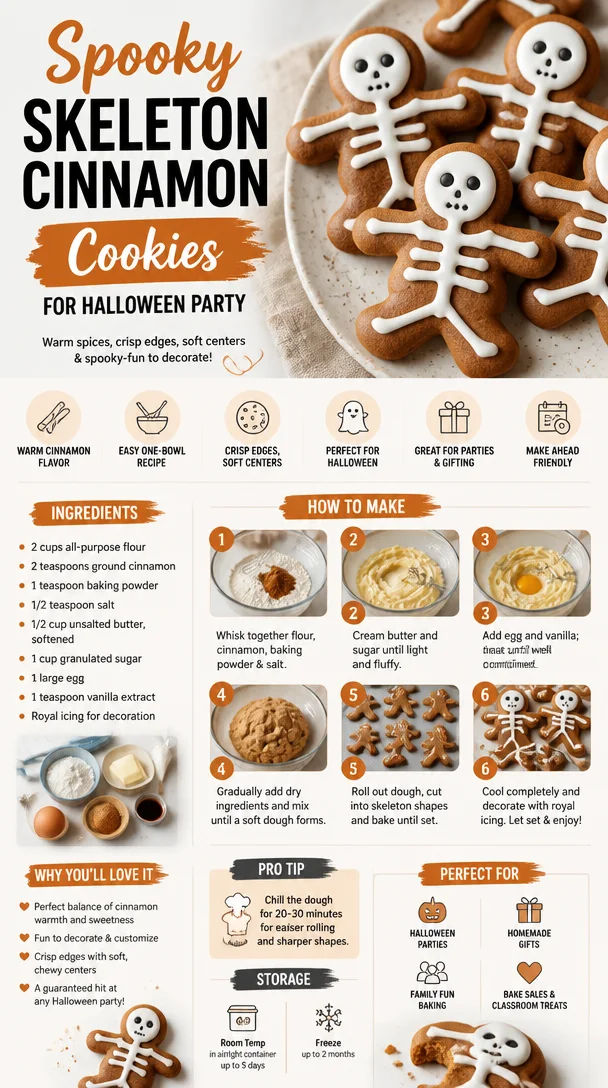
Unleashing the Spirit of Halloween with Skeleton Cinnamon Cookies
Welcome to a spooktacular journey in the kitchen, where we blend warmth with a dash of whimsy! As the leaves turn and the air gets crisp, it’s time to channel our inner ghosts and goblins and whip up some delightful treats that will charm both little monsters and adult spooky enthusiasts alike. Today, we’re diving into a recipe that’s equal parts cozy, fun, and perfect for Halloween: Skeleton Cinnamon Cookies!
A Nostalgic Bite of Fall
Let me take you back to my childhood, where autumn evenings were filled with the tantalizing aroma of cinnamon wafting through the kitchen. One particular Halloween, I decided to surprise my friends with homemade cookies for our annual pumpkin carving party. Armed with a rolling pin and a wild imagination, I crafted these delectable cookies shaped like skeletons. As I rolled out the dough and carefully cut out the shapes, I felt like a true artist—or maybe just an excited kid covered in flour!
The laughter, sticky fingers, and stories shared around the table as we decorated those cookies with royal icing made it a Halloween to remember. From that moment on, skeleton cookies became a delightful tradition in my home, and I can’t wait to share this recipe with you!
Ingredients to Create Sweet Magic
Let’s gather the ingredients for our Skeleton Cinnamon Cookies. Here’s what you’ll need:
-
2 cups all-purpose flour
This is our base! You can substitute with whole wheat flour for a rustic twist or a gluten-free blend if needed. -
2 teaspoons ground cinnamon
The star of our show! Feel free to explore different types of cinnamon like Saigon or Ceylon for a unique flavor. -
1 teaspoon baking powder
This helps our cookies rise and stay fluffy! Don’t confuse it with baking soda, which is used differently. -
1/2 teaspoon salt
A pinch of salt enhances all the flavors. You can use sea salt or Himalayan pink salt for a gourmet touch. -
1/2 cup unsalted butter, softened
Make sure your butter is at room temperature for easy mixing. You can use coconut oil for a dairy-free version! -
1 cup granulated sugar
Sweetness is key! Brown sugar can be used for a richer flavor, but it may alter the texture a bit. -
1 large egg
This binds everything together. For an egg-free version, try a flax egg (1 tablespoon ground flaxseed + 2.5 tablespoons water). -
1 teaspoon vanilla extract
Adds warmth and depth to our cookies! A splash of almond extract can switch things up beautifully. -
Royal icing for decoration
You can buy this pre-made or make your own. It’s the fun part where you can let your creativity shine!
Let’s Get Baking: Step-by-Step Instructions
Ready to transform your kitchen into a haunted bakery? Let’s start making our Skeleton Cinnamon Cookies!
Step 1: Preheat and Prep
Preheat your oven to 350°F (175°C). Line two baking sheets with parchment paper. While the oven warms up, you can think of all the spooky designs you want to create on your cookies!
Step 2: Combine Dry Ingredients
In a mixing bowl, whisk together the flour, ground cinnamon, baking powder, and salt. This is an essential step because it ensures that your spices are evenly distributed throughout the dough. Pro tip: sifting the flour can help remove any lumps and give you a smoother dough!
Step 3: Cream the Butter and Sugar
In a separate bowl, beat together the softened butter and granulated sugar until the mixture is light and fluffy—about 2-3 minutes. You’ll know it’s ready when it looks pale and airy. This process is your secret weapon for getting those cookies nice and tender!
Step 4: Add Egg and Vanilla
Crack in the large egg and pour in the vanilla extract. Mix until well combined. It might look a bit messy, but that’s part of the fun!
Step 5: Combine Wet and Dry Ingredients
Gradually add the dry mixture to the wet mixture, stirring until you have a cohesive dough. If it seems too sticky, add a little more flour, a tablespoon at a time. Don’t overmix; we want soft and tender cookies.
Step 6: Roll Out the Dough
Flour your countertop lightly and roll out the dough to about 1/4-inch thickness. Use a fun skeleton-shaped cookie cutter to cut out your cookies. Place them on the prepared baking sheets, leaving a little space between them.
Step 7: Bake the Cookies
Slide the baking sheets into your preheated oven and bake for 8-10 minutes, or until the edges are lightly golden. Keep an eye on them to avoid overbaking—no one likes a hard cookie!
Step 8: Cool and Decorate
Let the cookies cool on the baking sheets for a few minutes before transferring them to a wire rack to cool completely. Once cool, it’s time to unleash your inner artist!
Decorating with Royal Icing
Use royal icing to decorate your skeleton cookies. Pipe designs that turn your cookies into fabulous little skeletons. Go wild—add goofy faces, intricate bones, or even some spooky colors! Remember, the more fun, the better!
Serving Suggestions: How to Plate Your Cookies
Now that you have your cookies beautifully decorated, it’s time to showcase your masterpiece! Arrange your skeleton cinnamon cookies on a festive platter or a spider web tablecloth for a real Halloween vibe. You could also bag them up in little treat bags as a wonderful gift for friends or neighbors, because sharing is caring, especially when it comes to cookies!
Recipe Variations: Get Creative!
Let’s not stop here! Here are some twists and creative variations to add to your Skeleton Cinnamon Cookies:
-
Chocolate Chip Skeleton Cookies: Add half a cup of mini chocolate chips to the dough before rolling it out. Chocolate and cinnamon? Yes, please!
-
Pumpkin Spice Twist: Swap out half the cinnamon for pumpkin spice or add a couple of tablespoons of pure pumpkin puree for a fall twist.
-
Maple Icing: Replace royal icing with a simple maple glaze for a yummy alternative. Just mix powdered sugar with maple syrup and a splash of milk until you reach your desired consistency.
-
Nutty Crunch: Add chopped pecans or walnuts to the dough for some extra texture. Just be sure to adjust the flour a bit if the dough feels too wet!
-
Gluten-Free Option: Use a gluten-free flour blend—just make sure to check that your baking powder is also gluten-free.
Chef’s Notes: A Little More on My Skeleton Cookie Journey
These cookies hold a special place in my heart, not just for their flavor but for the memories tied to them. Over the years, they’ve brought family and friends together, sparking joy and laughter at many gatherings. I remember one Halloween where my friends and I created a skeleton cookie competition. The creativity that flourished that day was incredible, and I’m happy to say I won first prize (my cookies tasted better than they looked!).
You’ll find that these cookies stay fresh in an airtight container for several days. Just make sure to enjoy them before they disappear—because trust me, they will!
FAQs and Troubleshooting
1. My cookies spread too much while baking—what did I do wrong?
This can happen if your butter was too warm or if the dough wasn’t chilled long enough. Remember, the colder the dough, the less it spreads!
2. How can I fix dry cookie dough?
If your dough seems crumbly and too dry, try adding a tablespoon of milk or water until it reaches the right consistency. You want it pliable but not sticky!
3. Can I freeze these cookies?
Absolutely! You can freeze the decorated cookies or freeze the unbaked dough and slice it into shapes to bake later. Just wrap them tightly in plastic wrap!
4. How can I store my cookies?
Keep them in an airtight container at room temperature for up to a week, or in the refrigerator for longer life. If you have decorated cookies, use parchment paper between layers to avoid sticking.
Nutritional Info (optional)
While the joy of baking sometimes means indulgence, here’s a sneak peek at the rough nutritional breakdown per cookie (based on a batch of 24):
- Calories: ~100
- Protein: 1g
- Carbohydrates: 15g
- Fat: 4g
- Sugar: 6g
Remember, moderation is key, especially when enjoying festive treats!
There you have it! Your guide to making delightful Skeleton Cinnamon Cookies and creating memories that will last beyond Halloween. Let’s bring the warmth and coziness back to the kitchen, invite family and friends, and let’s get baking! What are you waiting for? Dive into the season of flavors and fun! Happy Halloween! 🎃✨
PrintSkeleton Cinnamon Cookies

Delightful Skeleton Cinnamon Cookies perfect for Halloween, blending cozy flavors with fun shapes.
- Prep Time: 20 minutes
- Cook Time: 10 minutes
- Total Time: 30 minutes
- Yield: 24 cookies 1x
- Category: Dessert
- Method: Baking
- Cuisine: American
- Diet: Vegetarian
Ingredients
- 2 cups all-purpose flour
- 2 teaspoons ground cinnamon
- 1 teaspoon baking powder
- 1/2 teaspoon salt
- 1/2 cup unsalted butter, softened
- 1 cup granulated sugar
- 1 large egg
- 1 teaspoon vanilla extract
- Royal icing for decoration
Instructions
- Preheat your oven to 350°F (175°C). Line two baking sheets with parchment paper.
- Combine the flour, ground cinnamon, baking powder, and salt in a mixing bowl.
- Cream together the softened butter and granulated sugar until light and fluffy, about 2-3 minutes.
- Add the large egg and vanilla extract, mixing until well combined.
- Combine the dry mixture with the wet mixture, stirring until you have a cohesive dough.
- Roll out the dough to about 1/4-inch thickness and cut into skeleton shapes.
- Bake for 8-10 minutes or until the edges are lightly golden.
- Cool on a wire rack and decorate with royal icing.
Notes
These cookies stay fresh in an airtight container for several days. Enjoy them before they disappear!
Nutrition
- Serving Size: 1 cookie
- Calories: 100
- Sugar: 6g
- Sodium: 100mg
- Fat: 4g
- Saturated Fat: 2g
- Unsaturated Fat: 2g
- Trans Fat: 0g
- Carbohydrates: 15g
- Fiber: 0g
- Protein: 1g
- Cholesterol: 25mg
Keywords: Halloween, Cinnamon Cookies, Skeleton Cookies, Holiday Baking, Dessert