Home Canned Peaches: A Sweet, Summery Tradition
Hello, dear food lovers! Nina here, and today I’m thrilled to dive into one of my all-time favorite summer traditions: home-canned peaches. Can you smell the sweet, inviting aroma wafting through the air as we transform fresh, ripe peaches into luscious golden jars of joy? There’s something incredibly satisfying about preserving these delightful fruits, especially when you know they’ll bring the taste of summer sunshine to your table all year round.
So, grab your aprons and let’s take a stroll down memory lane while we whip up this gorgeous treat!
A Nostalgic Journey: The First Time I Made Canned Peaches
As a kid, summers at my grandparents’ house were pure bliss. The warm sun kissed my cheeks as I wandered through their garden, collecting ripe fruits of every kind: tomatoes, strawberries, and of course, the star of today’s show—peaches! My grandma would always call me in when it was time to help her with her special canning day.
I remember standing on a stool by the kitchen counter, my little hands clumsily trying to keep up with her seasoned grace as we peeled, sliced, and packed those glorious peaches into bright jars. It was a magical process, a symphony of bubbling water, sweet laughter, and the occasional splash of juice that would send us both into fits of giggles. By the end of the afternoon, those jars were filled with sunshine, and we’d sneak a few slices to enjoy with our dinner. It’s that sense of warmth and nostalgia that I cherish today as I pass down the tradition of home canning to you.
So, let’s gear up to capture that summer sweetness in a jar!
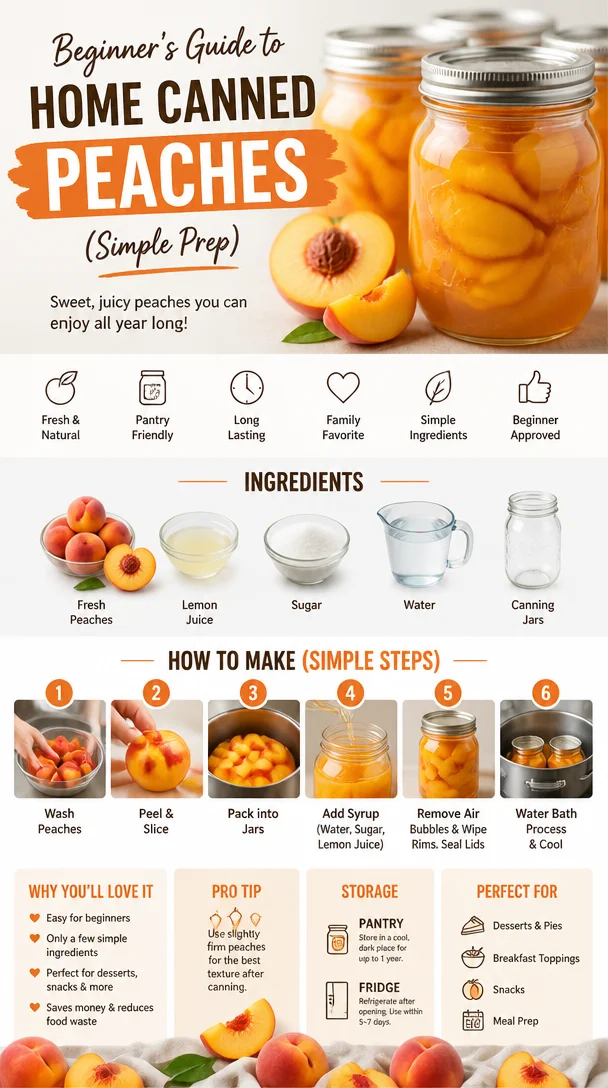
Ingredients
Here’s what you’ll need to get started on your own batch of canned peaches:
-
Fresh Peaches:
- Aim for ripe, fragrant peaches.
- Substitution tip: If fresh peaches aren’t in season, you can use frozen peaches, but the texture may be slightly different.
-
Lemon Juice:
- This will help prevent the peaches from browning and adds a zesty flavor.
- Quick chef insight: Fresh lemon juice is best, but bottled can work if you’re in a pinch.
-
Sugar:
- This sweetens the syrup that coats the peaches.
- Substitution tip: You can use honey or agave syrup for a natural sweetener, but adjust the quantity to taste.
-
Water:
- Just plain old water to create the syrup.
- Note: You can also use fruit juice for a different flavor profile!
-
Canning Jars:
- Ensure you have clean, sterilized jars (quart or pint sizes work well).
- Insight: Make sure the jars are BPA-free for safety.
Step-by-Step Instructions
Let’s get those peaches in jars! Follow these steps for a delicious batch of canned peaches:
1. Prepare Your Ingredients
Grab your peaches and give them a good rinse under cool water. They’ll need a little help getting ready for their big jar debut!
2. Blanch and Peel the Peaches
Bring a large pot of water to a boil. Carefully lower your peaches in using a slotted spoon and allow them to blanch for about 30 seconds to 1 minute. This will help loosen the skins.
Chef Tip: Immediately after blanching, transfer the peaches to a bowl of ice water using the slotted spoon. This will stop the cooking process and make peeling a breeze!
3. Slice and Core
Peel the skins from the peaches and slice them in half to remove the pit. You can give the pits a gentle twist to loosen them; they should come out easily!
Note: If you’re using a peach with a clingstone pit, be patient as it takes a little more finesse to remove.
4. Prepare the Syrup
In a saucepan, combine 4 cups of water and 1 cup of sugar (or your preferred sweetener). Stir over medium heat until the sugar dissolves.
Chef Hack: Taste your syrup! If you like a sweeter outcome, feel free to add more sugar, but remember: less is more when it comes to those sweet peaches!
5. Pack the Jars
Start packing the peach halves into your sterilized canning jars. You want them snug, but not squished together—think of it like arranging a charcuterie board; it should be beautiful and organized!
6. Add the Syrup
Pour the syrup over the peaches, leaving about half an inch of headspace at the top of each jar.
Little Tip: Tap the jars gently on the counter to release any air bubbles before sealing!
7. Seal and Process
Wipe the rims of the jars with a clean cloth to ensure a tight seal. Place the lids on securely and screw on the bands until they’re fingertip-tight.
Canning Instructions
In a large pot or canner, place the jars upright and cover them with water (making sure they’re submerged by at least an inch). Bring the water to a boil and process for about 20 minutes.
Pro Tip: If you’re at a higher elevation, you may need to add a few extra minutes to the processing time.
8. Let Them Cool
Carefully remove the jars from the pot and let them cool on a kitchen towel. You should hear that satisfying “pop” as they seal!
Serving Suggestions
There’s a world of deliciousness you can create with your beautifully canned peaches. Here are a few serving ideas:
- Dessert Delight: Serve them warm over vanilla ice cream for a summertime treat that will have everyone asking for seconds.
- Breakfast Bliss: Layer the peaches in a parfait with yogurt and granola for a quick, nutritious breakfast.
- Savory Twist: Add them to a salad with mixed greens, goat cheese, and walnuts for a flavorful twist.
Recipe Variations
Want to mix things up a bit? Here are some creative twists for your canned peaches:
- Spiced Peaches: Add a cinnamon stick and a touch of nutmeg to the syrup for a warm, spiced flavor.
- Herbal Infusion: Toss in some fresh thyme or basil while cooking the syrup.
- Coconut Milk: Substitute half the water for coconut milk for a tropical flavor that’s simply irresistible.
- Ginger Zing: Add slices of fresh ginger to the syrup for a little kick.
Chef’s Notes
I love how this recipe evolves with each batch made. Sometimes I toss in a little bit of vanilla extract or even almond extract for a unique flavor profile. Remember, canning is an art, and your kitchen is your canvas!
And, of course, who remembers those accidental spills? The sticky syrup on the counter? It might look like a mess at the time, but those are the moments that create the best stories. Plus, it gives you an excuse to taste-test every time!
FAQs and Troubleshooting
-
Can I use unripe peaches?
- It’s best to use ripe peaches for canning. Unripe peaches can be too firm, and they won’t have the sweet flavor we’re looking for, even in jars.
-
What do I do if the jars don’t seal?
- No worries! If you notice a jar hasn’t sealed, you can either reprocess it or place it in the fridge and consume it within a few days.
-
How long can I store canned peaches?
- Properly canned peaches can last for up to a year in a cool, dark place. However, they’re always best consumed within the first few months for optimal flavor!
-
What do I do if my peaches are mushy?
- That can happen! If peaches are too ripe when you can them, they may become mushy. Always choose firm, ripe peaches for the best results.
Nutritional Info
While home-canned peaches are a delight, it’s always a good idea to keep an eye on portion sizes, especially if you’re watching your sugar intake. Here’s a quick glance:
- Serving Size: 1/2 cup
- Calories: Approximately 80
- Sugars: Varies depending on the amount of sugar you use
Wrapping It All Up
There you have it, folks—canned peaches that capture the essence of summer in a jar! I hope this recipe inspires you to gather your loved ones in the kitchen and make some sweet memories of your own. Whether for yourself or as a special gift to a friend, these canned peaches are sure to bring joy and warmth, just as they have for me over the years.
So, roll up your sleeves, get ready to slice, and let’s keep those summer vibes alive—one jar of peaches at a time! Happy canning! 🍑✨
PrintHome Canned Peaches
Preserve the taste of summer with these delightful home-canned peaches, perfect for enjoying all year round.
- Prep Time: 15 minutes
- Cook Time: 30 minutes
- Total Time: 45 minutes
- Yield: 4 servings
- Category: Dessert
- Method: Canning
- Cuisine: American
- Diet: Vegetarian
Ingredients
- Fresh Peaches
- Lemon Juice
- Sugar
- Water
- Canning Jars
Instructions
- Prepare Your Ingredients by rinsing the peaches under cool water.
- Blanch and Peel the Peaches by boiling them for 30 seconds to loosen the skins.
- Slice and Core the peaches, removing the pits carefully.
- Prepare the Syrup by combining 4 cups of water and 1 cup of sugar in a saucepan and heating until dissolved.
- Pack the Jars with peach halves snugly without squishing.
- Add the Syrup over the peaches, leaving half an inch of headspace.
- Seal and Process the jars in boiling water for about 20 minutes.
- Let Them Cool on a kitchen towel after removing from the pot.
Notes
Canned peaches can last up to a year in a cool, dark place, but are best consumed within the first few months.
Nutrition
- Serving Size: 1/2 cup
- Calories: 80
- Sugar: 15g
- Sodium: 0mg
- Fat: 0g
- Saturated Fat: 0g
- Unsaturated Fat: 0g
- Trans Fat: 0g
- Carbohydrates: 20g
- Fiber: 1g
- Protein: 1g
- Cholesterol: 0mg
Keywords: canned peaches, summer recipe, preserving fruit, homemade canned peaches, peach canning